These are the step-by-step instructions to set up your Magento 1 shopping cart connection to Infoplus to receive orders.
Connect Infoplus to your Magento 1 Site
If you have a Magento eCommerce site, you can integrate the site with Infoplus. Infoplus provides connections for Magento 1, described here, and for Magento 2. When an order is placed on your Magento site containing Infoplus SKUs, use Infoplus to fulfill the order. Your Inventory levels from Infoplus are automatically pushed to Magento. Everything happens in real-time.
NOTE: We recommend that you first set up the Magento 1 integration on a test Magento site (if you have one). Then, after testing, do the same thing on your Production Magento site.
Here's what happens after connecting Infoplus to your Magento 1 Site:
- When a Magento order is placed, Infoplus will be notified of the new order.
- If the shopping cart connection is set to "Fulfill All Items", the order and line items will be pulled into Infoplus where the order can be fulfilled. If the connection is not set to "Fulfill All Items", Infoplus will evaluate each of the products on that order. If any products are flagged for being fulfilled by Infoplus in Magento, the order and the Line Items will be pulled into Infoplus. Line items that are not flagged to be fulfilled will be ignored. If no items on the order are set to be fulfilled by Infoplus, the order will not be pulled into Infoplus.
- When the order is shipped in Infoplus, Infoplus notifies Magento of the order's shipped status, and tracking numbers are added to the Magento order.
- Inventory levels for Magento products flagged for being fulfilled by Infoplus will be pushed from Infoplus to Magento in real-time. You may configure your products in Magento to be removed from your site when they are out of stock, to help prevent taking Backorders.
How to Connect Infoplus to your Magento 1 Site in Six Steps
Step 1: Download and Install the Infoplus Extension into your Magento 1 Site
This step gives Infoplus access to your Magento site.
- In a web browser, go to the Magento Connect Marketplace.
- Search for "Infoplus" to find the Infoplus extension for Magento.
- Click on the Infoplus extension.
- Click the Install Now button.
NOTE: You may need to log into the Magento Connect Marketplace to continue. - Review the extension license agreement.
- After agreeing to the extension license agreement, click the Get Extension Key button.
- Copy the URL that appears by clicking the Select Key button.
- Open Magento and access the Admin Panel.
- Click on System > Magento Connect > Magento Connect Manager.
- In the section labeled "Install New Extensions", right-click in the Extension Key field and select Paste to paste the Extension Key you copied earlier.
- Click the Install button.
- In the Confirmation window, click Proceed. The Magento Connect Manager will download and install the Infoplus extension.
- After the installation is complete, click the Refresh button and look for the Infoplus extension listed in the set of currently installed extensions.
- Return to the Admin Panel and log out and back in to ensure you are using a new session to continue with the next set of steps.
Step 2: Create an API Role & User in Magento 1
This step gives Infoplus access to data from your Magento store.
1) Create a Role
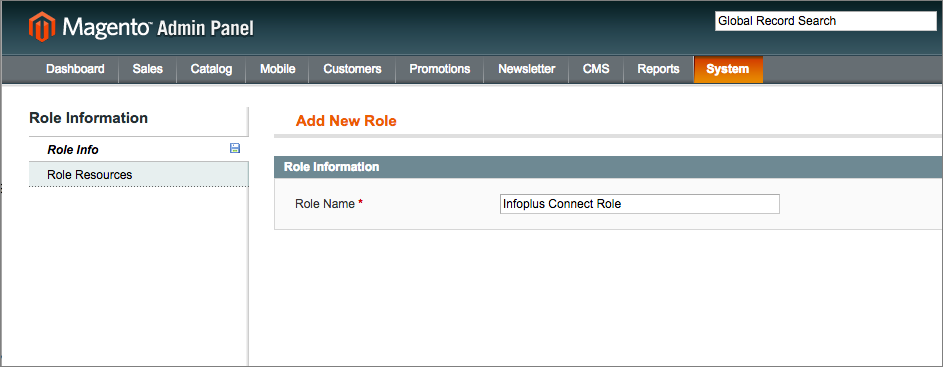
Here is a screenshot showing the creation of the role as instructed below:
- Open Magento and access the Admin Panel.
- Click on System > Web Services > SOAP/XML-RPC-Roles.
- Click the Add New Role button.
- Type a Name for the Role. We recommend naming the role "Infoplus Connect Role."
- Click on Role Resources section on the left and select All from the dropdown.
- Click Save Role.
2) Create a User
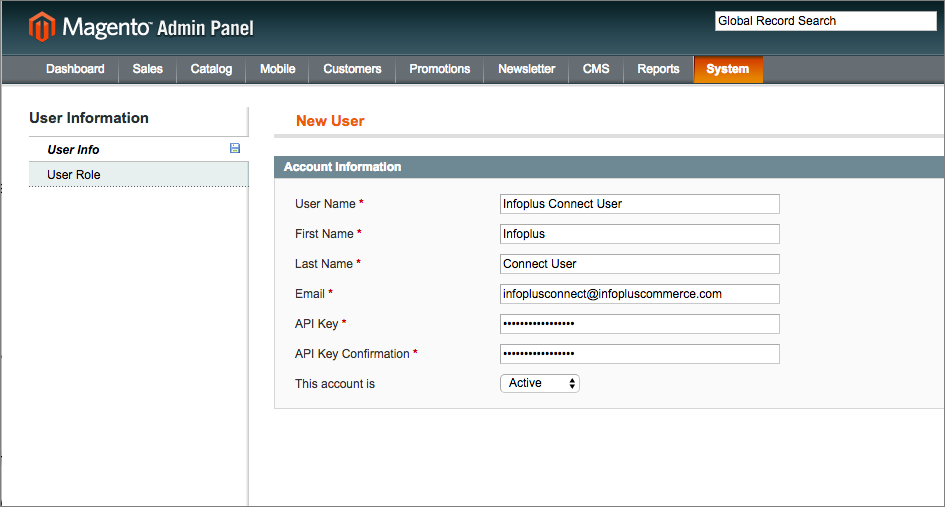
Here is a screenshot showing the creation of the user as instructed below:
- From the Admin Panel, click on System > Web Services > SOAP/XML-RPC-Users.
- Click the Add New User button.
- Fill in the required details for the user. We recommend the following:
- User Name: Infoplus Connect User
- First Name: Infoplus
- Last Name: Connect User
- Email: infoplusconnect@infopluscommerce.com
- API Key: Use a randomly generated and secure value. (Consider using an online service for generating this random password. Here is search criteria to identify a service.) - Click on the User Role section on the left, and select the Role you created earlier.
- Click Save User.
Step 3: Create an Infoplus Shopping Cart Connection for Magento 1
- In Infoplus, go to the Shopping Cart Connection table. Two ways:
- From the Dashboard: Click the “Account Management” tab, click the “Shopping Cart” App, then click the “Shopping Cart Connection” Table.
- From the Quick Actions shortcut: Press a dot (period) on your keyboard, then select “Shopping Cart Connection” from the list of Quick Actions. -
Click the Create New button. The Creating New Shopping Cart Connection window appears.
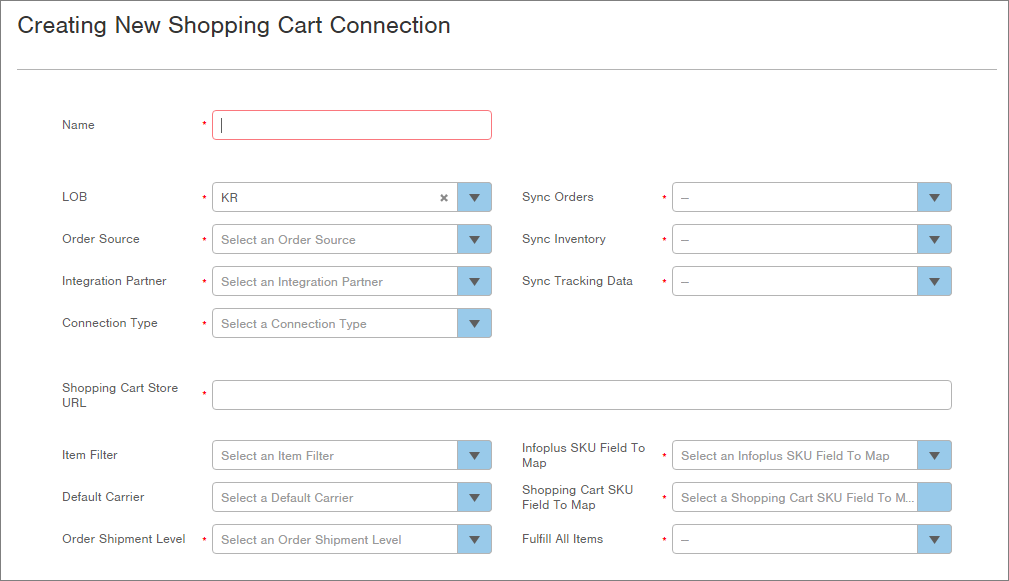
- Type a Name for the Shopping Cart connection (e.g. Magento 1 SCC).
- In the LOB field, select the Line of Business associated with the shopping cart.
- Select the Order Source associated with the shopping cart (e.g. Walmart, Amazon). If an Order Source is not applicable, select "Not Specified." Selecting an Order Source for Magento orders lets you locate records and perform other actions in Infoplus (e.g., create metrics associated with the Order Source).
NOTE: Selecting an Order Source does not communicate which Magento orders are to be fulfilled by Infoplus. It provides information only. - Select the Integration Partner for this shopping cart connection (e.g. SPS Commerce). If there is no Integration Partner, select "Not Specified."
- In the Connection Type field, select "Magento 1." New fields for Username and Password will appear. The username and password correspond to the User Name and API Key that was setup within Magento in the previous step.
- In the Sync Orders field, select whether you want Orders that are placed in Magento to be synchronized with Infoplus. By selecting "True", when orders are created in Magento containing items to be fulfilled by Infoplus, an order will automatically be created in Infoplus.
- In the Sync Inventory field, select whether you want the Inventory levels to be pushed from Infoplus to Magento. Selecting "True" tells Infoplus to communicate inventory levels to Magento. Once synchronized, quantities of selected items will match.
- In the Sync Tracking Data field, select whether you want shipment Tracking Data to be pushed from Infoplus to Magento. Selecting "True" turns synchronization on. For example, you may want to send tracking data if you use Magento to email shipment confirmations.
- In the Shopping Cart Store URL field, enter your Magento store URL, e.g., "https://mystore.com/magento".
- The Item Filter field is optional. If you have a specific set of items that Infoplus should consider when pushing inventory levels to Magento, create a filter in the Item table, and then select the Filter here. If all items are to be considered, leave the field blank.
NOTE: Later in this process of connecting Infoplus to your Magento site, you will need to specify within each Product record in Magento if inventory levels should be pulled from Infoplus. An Item Filter simply allows you to narrow the list of items down further as opposed to updating each item in Magento. - If you want to use a default carrier for all Orders from your Magento 1 site, select a Default Carrier.
- In the Order Shipment Level field, select how you want to update shipment of the order in Magento, at the Order level or the ltem level.
- If set to "Order", the shipment status of the order will change to "Complete" even if all line items have not been fulfilled by Infoplus, or if a line item on the order was not fulfilled as ordered (e.g., because of a substitution, item removed from order, or item not fulfillable by Infoplus).
- If set to "Item", the status of the order will change to "Complete" if all line items on the order were able to be fulfilled by Infoplus. If the order includes some items that were not fulfillable by Infoplus, the status of the order will stay as "Processed". Tracking will be available for line(s) that were fulfilled by Infoplus. - In the Infoplus SKU Field to MAP and Shopping Cart SKU Field to Map fields, select the product identifiers that should be used to match products between Infoplus and Magento. For example, if both Infoplus and Magento use a field called "SKU" to identify the product, set both fields to SKU. If different product identifiers are used, such as Vendor SKU or UPC, select that as the SKU field.
- In the Fulfill All Items field, select True or False. Selecting True says that all items ordered through Magento should be fulfilled by Infoplus. This selection eliminates the need to flag each individual item to be fulfilled by Infoplus. If an order comes through for an item that doesn't exist or is not mapped in Infoplus, a business transaction will be created to indicate this. If you select False, Infoplus will only attempt to fulfill items that are flagged to be fulfilled by Infoplus (steps to flag products are listed below).
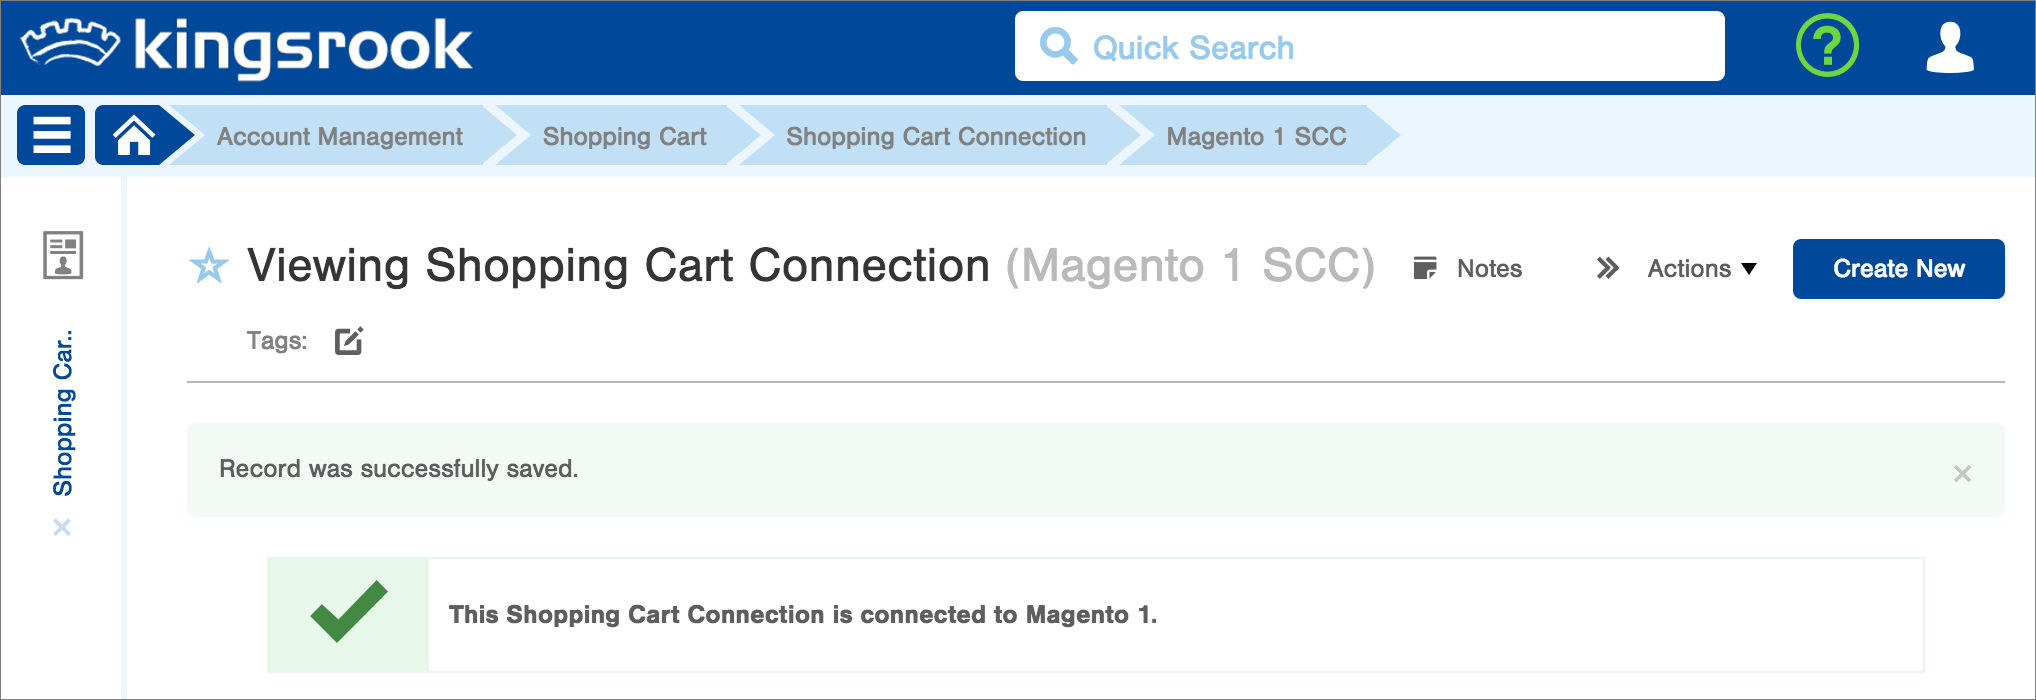
- Click Save. The record will be saved and a message will appear at the top of the screen indicating the connection was made successfully.
- Open Magento and access the Admin Panel.
- Click on System > Configuration.
- Locate the Infoplus section on the left side of the Configuration window and click on the Infoplus Settings link. The Infoplus URL field appears on the screen.

- Enter your Infoplus URL, which is the URL for your Infoplus instance. The URL must appear in this format: https://yourcompany.infopluswms.com . Notice that the URL starts with "https://" and has no slash (/) at the end.
- Click Save Config to finalize the connection between Infoplus and Magento.
Step 5: In Magento 1, Choose Which Products Should be Fulfilled by Infoplus
For each product you want Infoplus to fulfill, complete these steps in Magento.
NOTE: If you want all items to be fulfilled by Infoplus, select "True" in the "Fulfill All Items" field when creating your Shopping Cart Connection (instructions above). You can then skip this step.
- Open Magento and access the Admin Panel.
- Click on Catalog > Manage Products.
- Find and then click on the product that should be fulfilled by Infoplus.
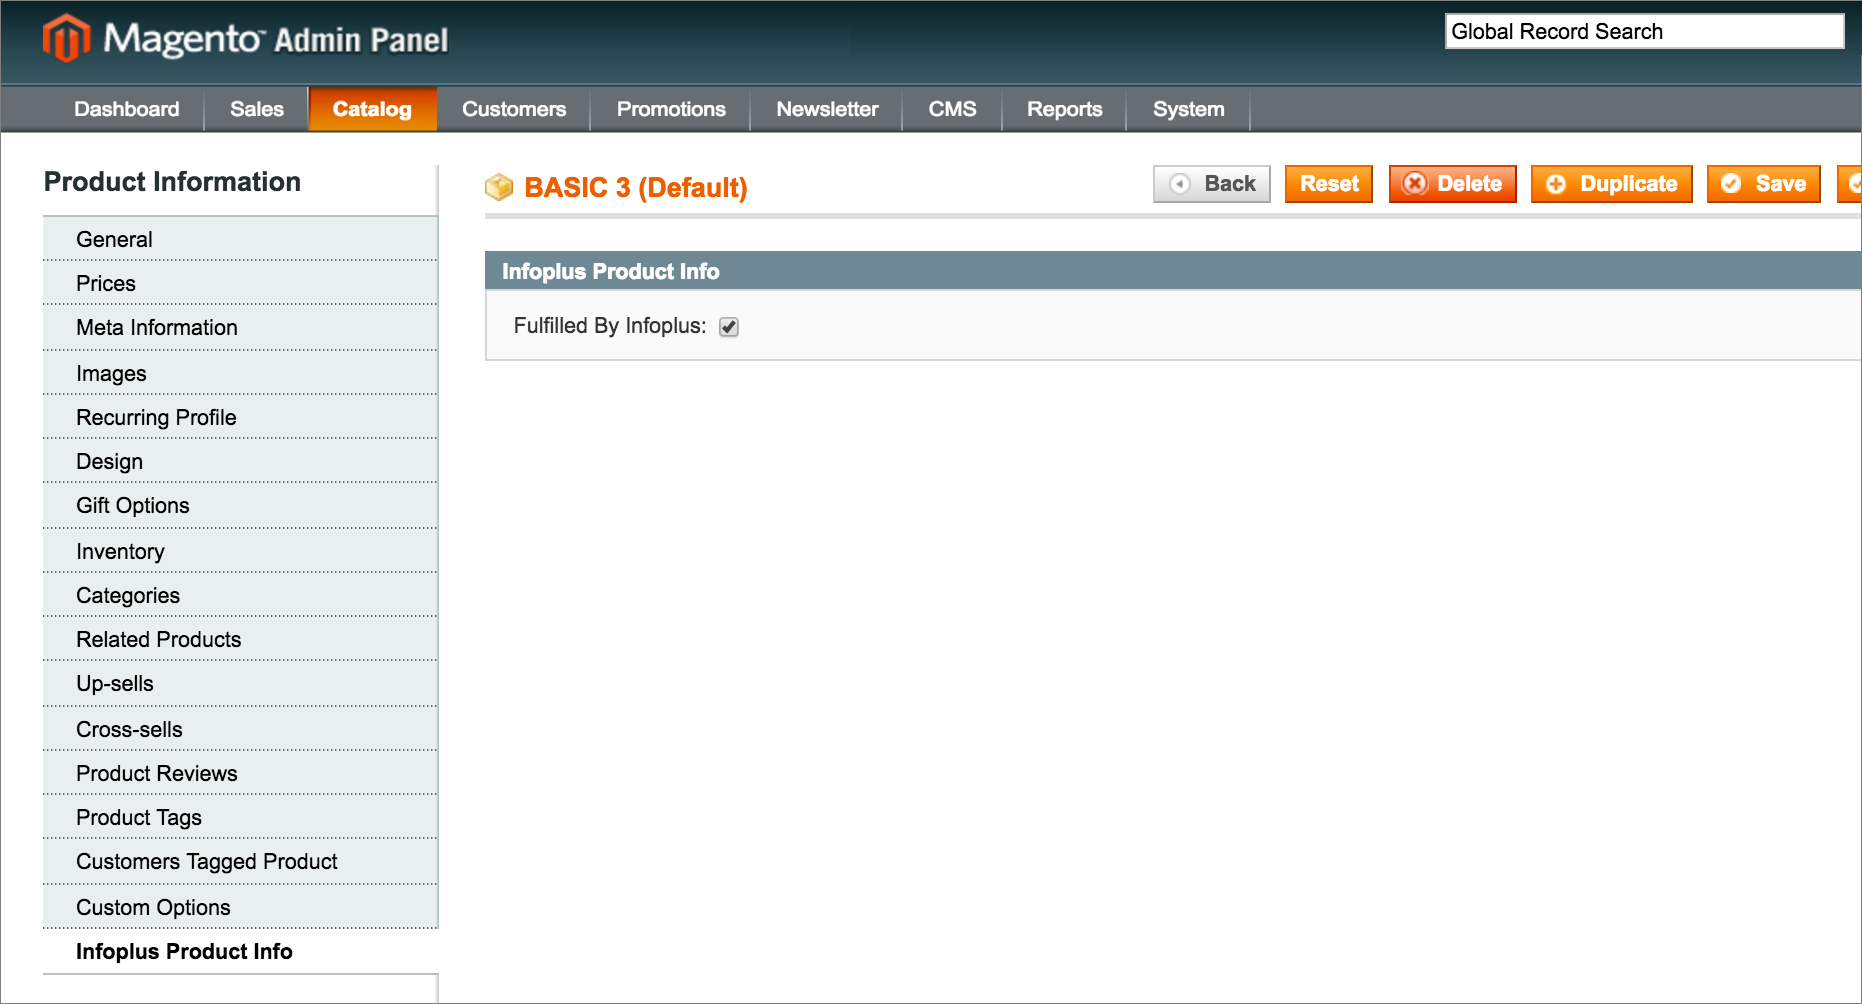
- Click on the Infoplus Product Info tab on the left to view the fulfillment setting for the product.
- Click the Fulfilled By Infoplus checkbox if it is not already checked. When the checkbox is checked, Infoplus will handle fulfillment for this product.
- Click the Save button. Infoplus inventory levels for these products will also be available to Magento.
Step 6: Test the Integration
This step confirms the integration.
- Place test orders in your Magento store containing one or more of the Products for which you specified fulfillment by Infoplus.
- Evaluate the orders to confirm that ones that should have been pulled into Infoplus succeeded.
NOTE: If testing on your Live site, you may want to delete the test orders in Infoplus and Magento.
View a Magento 1 Order in Infoplus
- Open Magento and access the Admin Panel.
- Click on Sales > Orders.
-
Find and then click on the order to view.
-
Click the View In Infoplus button.

-
The Infoplus Order table will appear in a new tab, filtered to show only the order of interest.

-
Click on the order to view all details.
Resend a Magento 1 Order to Infoplus
If an order from Magento is not appearing in Infoplus as expected, use the following steps to manually resend the order from Magento to Infoplus.
- Open Magento and access the Admin Panel.
- Click on Sales > Orders.
- Find and then click on the order that should be resent.
- Click the Resend To Infoplus button.

- A confirmation dialog will pop up. Click OK to resend the Order to Infoplus.
- A window containing a success message from Infoplus appears.


-1.png?height=120&name=InfoPlus-Primary-Logo%20(1)-1.png)