Create / Edit Items
Using the Item table in InfoPlus, you can create, edit, and delete items (SKUs) one at a time or in large batches. This article will explain where to find the Item table and how to fill out the required fields for each item.
Pro Tip: If you will be working with Kits or KODs (Kits on Demand), you will need to create the top-level Kit SKU UOM as 'Kit' (the SKU available for ordering), and any Component SKUs UOM as 'Each' (SKUs to be included in the Kit) before you can create the Kit in InfoPlus. See Create a Kit for more information.
NOTE: As part of your InfoPlus setup, a master record will have been created for each Line of Business which contains defaults for many fields in a new item record. When you see completed fields in a new record, it is likely coming from that master record. You can leave the default, or modify the field.
Caution: Once an Item (SKU) has been created, you can NOT edit the name. If there was a mistake in the SKU identifier, Delete the Item Record before adding inventory. Otherwise, you will need to set the Status to "Blocked". See the bottom of this article on "Changing the Status of an Item"
How to Create an Item
1. Access the "Item" table. Two methods:
- Via the Dashboard: Click Warehouse Operations > Item Management > Item
- Via the Quick Actions Shortcut: Press the dot (period) on your keyboard, then select "Item" from the list of Quick Actions.
2. Click the Create New button in the top right and fill out the required fields and tabs listed in this article. Required tabs and fields are denoted by a red asterisk symbol (*).

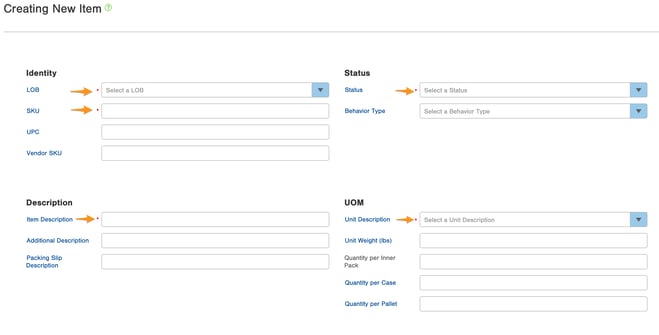
Required Fields
Below is a list of required Fields and Tabs that need to be filled out when creating a new item record. Required tabs and fields are denoted by a red asterisk symbol (*).
LOB
The Line of Business associated with this Item. This will designate the specific line of business to which that item belongs. Each Item record can only be assigned one Line of Business. If the same physical item is stocked by multiple LOBs, you will likely need to create multiple Item records depending on how you have setup LOBs on your site.
SKU
The Stock Keeping Unit to be used for the Item.
-
A SKU can be up to 100 characters and can include:
-
Capital letters: A–Z (InfoPlus will automatically change lowercase letters to capital letters)
-
Numbers: 0–9- Special characters: # _ - / . ( )
-
Spaces (do not use groups of two or more spaces together)
-
|
Examples of a Good SKU |
|
|
Examples of a Bad SKU |
|
Item Description
The description for the item (i.e., Generic White Binders).
-
You may use up to 40 characters for this field.
-
Enter an Additional Description if desired (which also has a 40 character limit).
Tip: When viewing an item in the table, you may notice the Full Description column/field. The Full Description field is the combination of the Item Description and the Additional Description fields. The full description is not directly editable and has a character limit of 96 characters.
Item Status
Describes the current status of the item and dictates whether the item can be used in various InfoPlus processes. See table below for the possible values allowed.
| Item Status Types | Descriptions |
| Active | Item can be ordered and will be restocked when inventory is low |
| Deplete | Item is stocked but is not planned to be reproduced. Once inventory is gone, no backorders will be created and orders will be shipped minus the depleted item. |
| Blocked | Item can no longer be ordered or replenished |
| Placeholder | Item is created but the item itself is not orderable or stocked |
| Outside Vendor | Item will be fulfilled by an outside business partner |
Unit Description
This value describes of the item's UOM. Displayed as a drop-down menu (i.e., binders, bottles, pads, etc.)
- Here is an article on how to create, edit, and delete Unit Descriptions.
Required Fields & Tabs - Continued
In the Tabs at the lower part of the Item record is a set of required and optional categories that need to be completed. These categories all have Tool Tips, that when clicked, will tell you what the field is looking for.

Alcohol Tab *
(optional if "Is Alcohol" = False)
Note: For Alcohol Items, you must add all the Alcohol data before you click "save". You will not be able to add Alcohol data as an edit after the process is complete.

Catalog Tab *
Connects an item to a catalog or unique category. This is often used by 3PLs who rely on catalogs that break items into unique categories.

Details Tab *
This tab allows you to group and identify items within certain characteristics such as a maximum orderable quantity or affiliating an item with a charge code.
Commodity Code: If this item will be used for international shipping, this is the code that will be sent to U.S. Customs as part of the request for international shipping labels. To add new codes to the list, please add them in the Commodity Code table.
NMFC Code: (National Motor Freight Classification) When producing a Bill of Lading that contains this item, the NMFC code will appear. Please contact InfoPlus Support to add additional NMFC codes to this list as needed.
- item type - "Hat"
- description - "Hat, Caps, NOI in boxes, 2 but less than 3 lbs/cu ft"
- class - "250"
- sub class - "3"

Note: In the Max Cycle and Max Interim fields, these are the maximum number of individual Items per line. So, if you need to ship 100,000 of SKU "Battery-AA", then the Max Cycle and Max Interim need to exceed that number. We suggest 999999 for both fields.
Operations Tab *
Please see this article Overview of Lot and Item Mixing Rule for further details and steps on how to complete this category.
Item Mixing Rules: If the item can be mixed with different items in forward or storage locations, select Multi. If the item needs to be stored by itself, select Single. See the Overview of Lot and Item Mixing Rules for more information.
Allocation Rule: Select whether the allocation of this item is guided by Strict FIFO, Weak FIFO, or Labor Optimized. For more information on these guidelines, read more about Allocation Rules.
Length, Width, Height: Enter the dimensions of the item for packing purposes
Top up: If the item should always be placed into a package with the top up, select True.
Ship Solo: If the item should always be shipped alone, select True. Note that Cartonization will work on Ship Solo items. However, they must be packed into their own cartons and shipped alone.
Serial Code: Select whether the item contains serial numbers that must be recorded for inbound and outbound, or outbound-only shipments; or sequential numbering that must be recorded for an outbound shipment.
Secure: If the item needs to be in secure storage, select Yes.
Barcode Field: If the picker will be prompted to scan this item when picking, this field needs to indicate what the item's barcode represents: SKU, UPC, Vendor SKU, Product ID Tag, or a Custom Field. NOTE: The Pick Scan Scheme is what determines if a prompt should appear to scan an item when picking.
Warehouse Display Field: If Pick documents should display information from a particular field in the SKU section, select SKU, UPC, Vendor SKU, Product ID Tag, or a Custom Field. SKU is the default when no value is selected.
Product ID Tag Scheme: If you want to track this item by a Product ID Tag (an ID assigned to an item to provide an additional level of tracking), select the Product ID Tag scheme to use. See Create and Use a Product ID Tag Scheme for more information.
Receiving Criteria Scheme: If you have diverse receiving criteria, on a per Item basis you can assign Receiving Criteria Schemes to Items to be used during Interactive Receiving. See Mobile Floor App - Interactive Receiving for more information. See Receiving Criteria Scheme for more information.
ASN Rule: You have the ability to choose three different options on how you want to receive this Item via the Interactive Receiving app. You can require an ASN for receiving (ASN Required), you can do both ASN's and Blind Receipts (ASN Allowed) or you can choose to only allow Blind Receipts (ASN not Allowed). See Blind Receiving without ASN for more information.
*Inner Pack Barcode: If you have the Quantity per Inner Pack field populated with a quantity, you can add a barcode value if your boxes have barcodes for the quantity.
*Case Barcode: If you have the Quantity per Case field populated with a quantity, you can add a barcode value if your boxes have barcodes for the quantity.
*Pallet Barcode: If you have the Quantity per Pallet field populated with a quantity, you can add a barcode value if your boxes have barcodes for the quantity.
* - ensure these fields are set on the Item record if you want to be able to pull up this Item when searching for it in the Mobile Floor App for Inventory actions such as Adjustment, Relocation, or Status. If these are not set, they will not be considered when you search for an Item in the Mobile Floor App.
Additionally, InfoPlus by default does not use these fields when searching for inventory via the Mobile Floor App and must be told to use them by having them enabled. To do so, go to the Warehouse table and then the Item Barcode Fields tab and set the values for these fields to True, like so:
Casebreak Enabled: If the item can be picked as a case, have the parcel label applied at the point of picking, and then be taken straight to shipping, select Yes. If the item should be picked and packed as into a carton, select No. If you leave the field blank, the default is No.
Assembly Instructions: Enter any special assembly instructions for this item (e.g. Use double bubble wrap for this item). These instructions will display on the Order Assembly Guide.
Purchasing Tab *
Note: while the Backorder field is the only required field on this tab, it has significant implications beyond a simple yes/no. Please review the article "How Infoplus Works with Backorders" for more information.
The fields on this tab are indicators that can help you order and re-order this particular item. For example, can this item be ordered by a customer if you do not currently have any in stock? Is the item created only after it is ordered? Etc.
Low Stock notifications will not be sent if there is an open PO on the item.
Optional Tabs
Stock Status Tab
indicate, if desired, a level at which the item should be considered for reordering. This can be done with a fixed reorder point (quantity) or lead time (in days). These settings are optional.
Customize your Dashboard to include Warning and Error to receive low stock notifications.
Type: If you have multiple warehouses, selections for each building will display. If you want to make selections across all warehouses, use the "Overall" Type. If you only have one warehouse, the "Overall" Type will be the only one displayed.
Fixed Reorder Point: Type the quantity at which the "Low Stock Contact" should be notified of low stock so items can be reordered. The "Low Stock Contact" is selected under the Purchasing tab.
Note: If you have an alert set up for "Low Stock", you must include a Fixed Reorder Point for the alert to trigger.
Lead Time: Type in the amount of lead time (in days) when the "Low Stock Contact" should be notified of low stock. For example, to be notified when stock is down to a 30-day supply, type 30. The "Low Stock Contact" is selected under the Purchasing tab.
Pricing Tab
This tab lists fields that indicate what the price that the Item sells for is.
Sell Price: If this field is populated, the Sell Price gets added to ASNs and Quick Receipts when the Item is added as a Line Item.
if Orders are coming from an eCommerce platform, the price that is in the platform will be entered on the Order, not the Sell Price unless "Price Mode" is set to "Push". Prices can also be overridden when Bulk Loading Orders.
Pricing Per: Indicates what UOM the sell price is applied at.
Optional Fields
Packing Slip Description
(This can be used as the Line Item Description in the Packing Slip Template.) Packing Slip Descriptions can be set separately from Item/Additional Descriptions as this is the language that will print directly to the packing slip and will appear nowhere else on the order.
Vendor SKU
Used if you need to display or keep track of a Vendor SKU on documents such as the packing list
UPC
(i.e., if you need to display the UPC on the packing list. It is listed under the Alcohol tab at the bottom of the screen)
Units Weight (lbs)
(i.e., the total weight of a wrapped unit impacts shipping selections and requirements)
Behavior Type
This is used when you add an item ad hoc to orders that qualify, such as any order over $100 gets a free T-shirt, etc. If the Behavior Type is set to insert, this particular item will not show up on the packing slip.
Primary and/or Pick Image
-
A "Primary" image is typically what the individual item looks like (i.e., if selling binders, it's an image of the binder).
-
A "Pick" image is what a shipment of the item looks like (i.e., an image of the box of binders). This "Pick" image provides receivers and warehouse operations teams with a visual check of the item being picked for shipping.
Pro Tip: The "Attach Primary Image" and "Attach Pick Image" options will not appear until after you have selected a Line of Business (LOB).
Item Inventory/Quantity Fields
"To understand the different Item quantity fields and how they reflect various inventory levels, please refer to the knowledge base article, "Item Records - Quantity, Status, and Key Fields."
How to Add an Image File
-
Either drag and drop the file onto the shaded area or click the Select File link and browse to the image file on your computer. The "Crop Image" window will display after you have selected your image.
Image Requirements:Image file type .png or .jpg Image file size No larger than 2MB Image resolution Resolution cannot be less than 160 x160 -
In the "Crop Image" window, drag the selection handles to crop the image, if necessary.
-
Click Save Image. The image appears in the item record. If you want to crop or delete the image, click the links above the image.
How to Edit an Item
Pro Tip: You can edit one item at a time (instructions below) or edit multiple items at once using Bulk Edit.
-
Access the “Item” table. (See instructions above.)
-
Click on the item you want to edit.
-
Click the Edit button at the bottom of the window.
-
Make the necessary edits. (Refer to field descriptions above.)
-
NOTE: To edit the Item's Status, click the Change link that appears next to the Status field. See the Change Status section at the bottom of this article.
-
-
When finished, click Save.
Note: The SKU associated with an item cannot be edited. If you need to change the SKU associated with an item, delete or block the item and create a new one.
Adding Additional SKUs to Items
In some instances, you may wish to add an additional SKU to your Item. Here are some methods to create additional SKUs:1. Setup a Custom Field for the additional SKU in the Item table.
2. Set the Warehouse Display ID to display SKU (Step 4 under 'Complete the necessary tabs at the bottom of the window' above)
Note: If you do choose to set the warehouse display ID to display SKU, this alternate SKU value will show up not only in the "SKU 2" field on receipts but also in other screens and documents related to operations.
Example
If you have an item that has a UPC value and you use the Warehouse Display Field of UPC (for SKU2), in addition to the SKU.
SKU or UPC Displayed Based on Location in InfoPlus
|
Location in InfoPlus
|
SKU or UPC
|
| Receiving Mobile Floor App | SKU |
| Work Ticket for a Fulfillment Pick | UPC |
| Perform Pick Work | UPC |
| Receiving Worksheet Putaway Ticket | SKU |
| Mobile Floor App Relocate Inventory | SKU |
| Inventory Relocation (Classic Mobile Floor Apps) | SKU |
| Order Assembly Guide | UPC |
How to Duplicate an Item
If you want to create an item that's similar to an existing item, duplicate that existing item to create a new one.
-
Access the “Item” table. (See instructions above.)
-
Click on the item you want to duplicate.
-
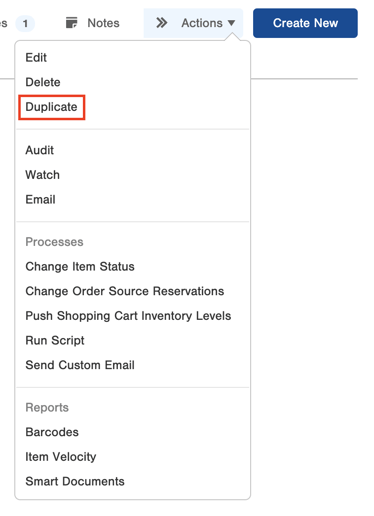
From the Actions menu in the top left, select Duplicate
-
Change the SKU, along with any other fields that need to be changed, then click save.
How to Delete an Item
Items that have no inventory and no activity associated with them in InfoPlus (e.g. orders, receipts) can be deleted. Please note that the activity associated with an item includes all past as well as current activity.
If there is activity associated with an item, you can edit the status to "Blocked" to prevent it from being selected for future orders.
Pro Tip: You can delete one item at a time (instructions below) or delete multiple items at once using Bulk Delete.
-
Access the “Item” table. (See instructions above.)
-
Click on the item you want to delete.
-
From the Actions menu, select Delete.
-
Click OK through the confirmation message.
Changing the Status of an Item
The Status of an Item impacts warehouse operations, so it's important that the Status be correct and easily updatable when it changes.
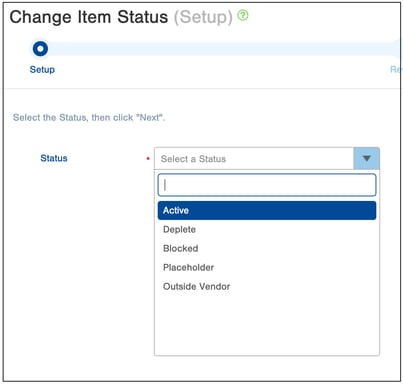
Available Item Statuses:
-
Active: The Item can be ordered and will be restocked when inventory is low.
-
Deplete: The Item is stocked but is not planned to be reproduced. Once inventory is gone, no backorders will be created and orders will be shipped minus the depleted item.
-
Blocked: The Item can no longer be ordered or replenished.
-
Placeholder: The Item is created in InfoPlus but the item itself is not orderable or stocked.
-
Outside Vendor: The Item will be fulfilled by an outside business partner.
Note: It is possible the Orderable Quantity won't change for a period of time after changing an Item's status to Blocked but creating/placing orders for this Item will not be possible as soon as the change is saved. The product will not allocate for a SKU once Blocked.
-
Access the "Item" table. Two ways:
From the Dashboard: Click the “Warehouse Operations” tab, click the “Item Management” App, then click the “Item” Table.
From the Quick Actions shortcut: Press a dot (period) on your keyboard, then select “Item” from the list of Quick Actions.
-
Click the checkbox next to each Item whose Status you want to change. You can select one or many Items.
NOTE: If only changing the Status of one Item, you can also open the Item and click the Change link next to the Status field (shown in the screenshot below).
-
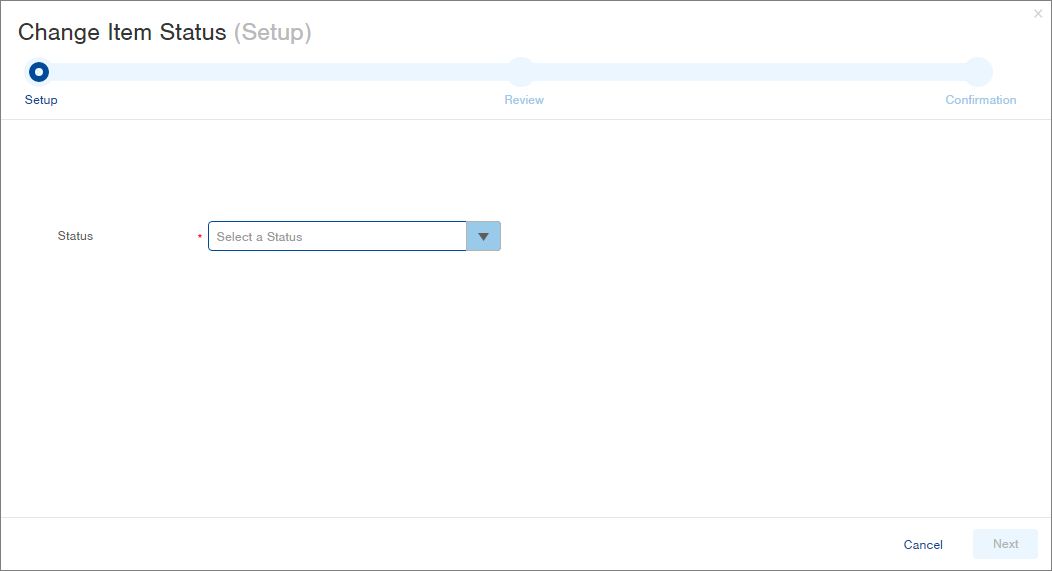
Click the Actions button and select Change Item Status. The Setup step in the Change Item Status process appears.
-
Click the drop-down arrow and select the appropriate Status. See the Status definitions above.
-
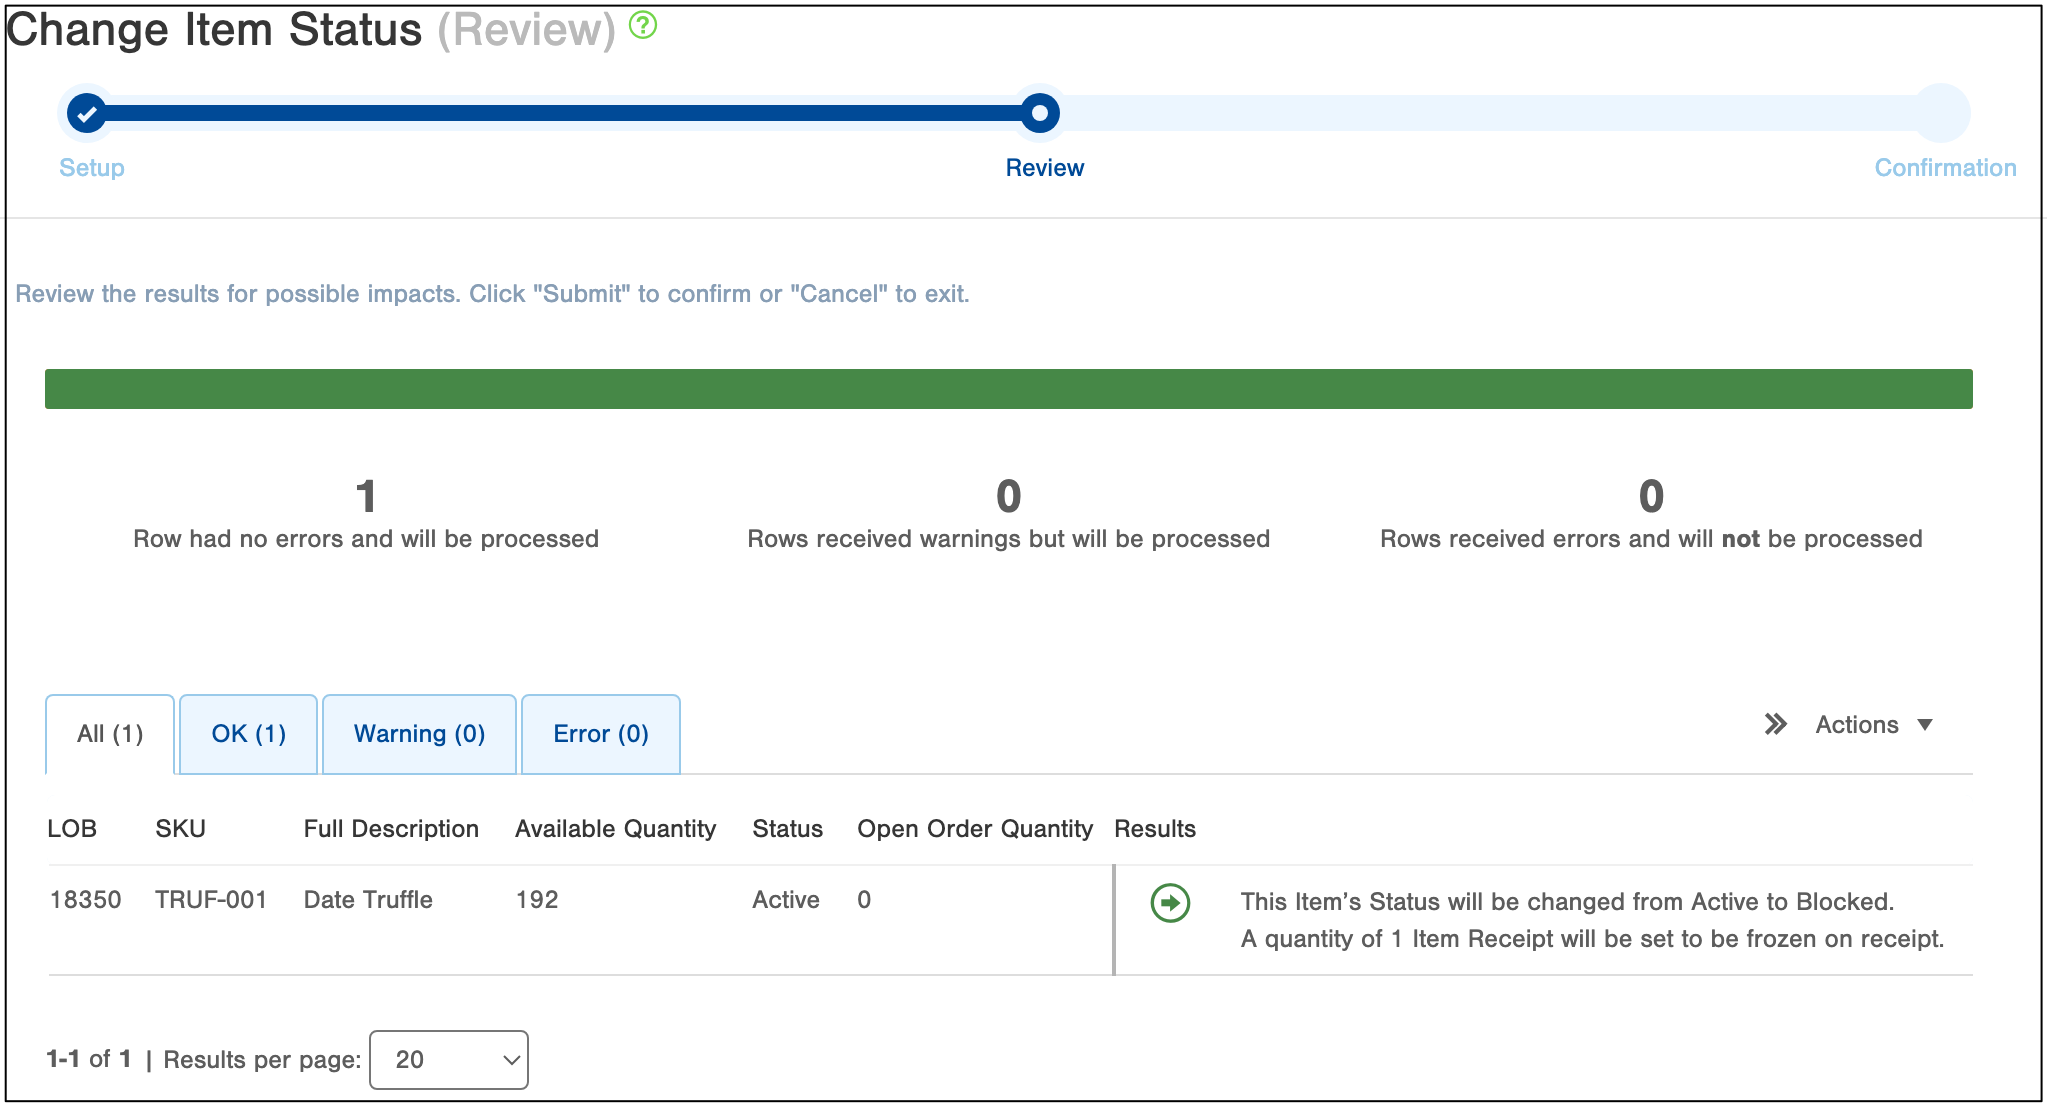
Click Next. The Review step in the process appears. The Results will indicate other impacts (if any) of the Status change. In the example below, the item's Status is being changed from Active to Blocked which impacts Item Receipts. Any open orders (as indicated in the "Open Order Quantity" column) should be reviewed for possible replacement or cancellation.
-
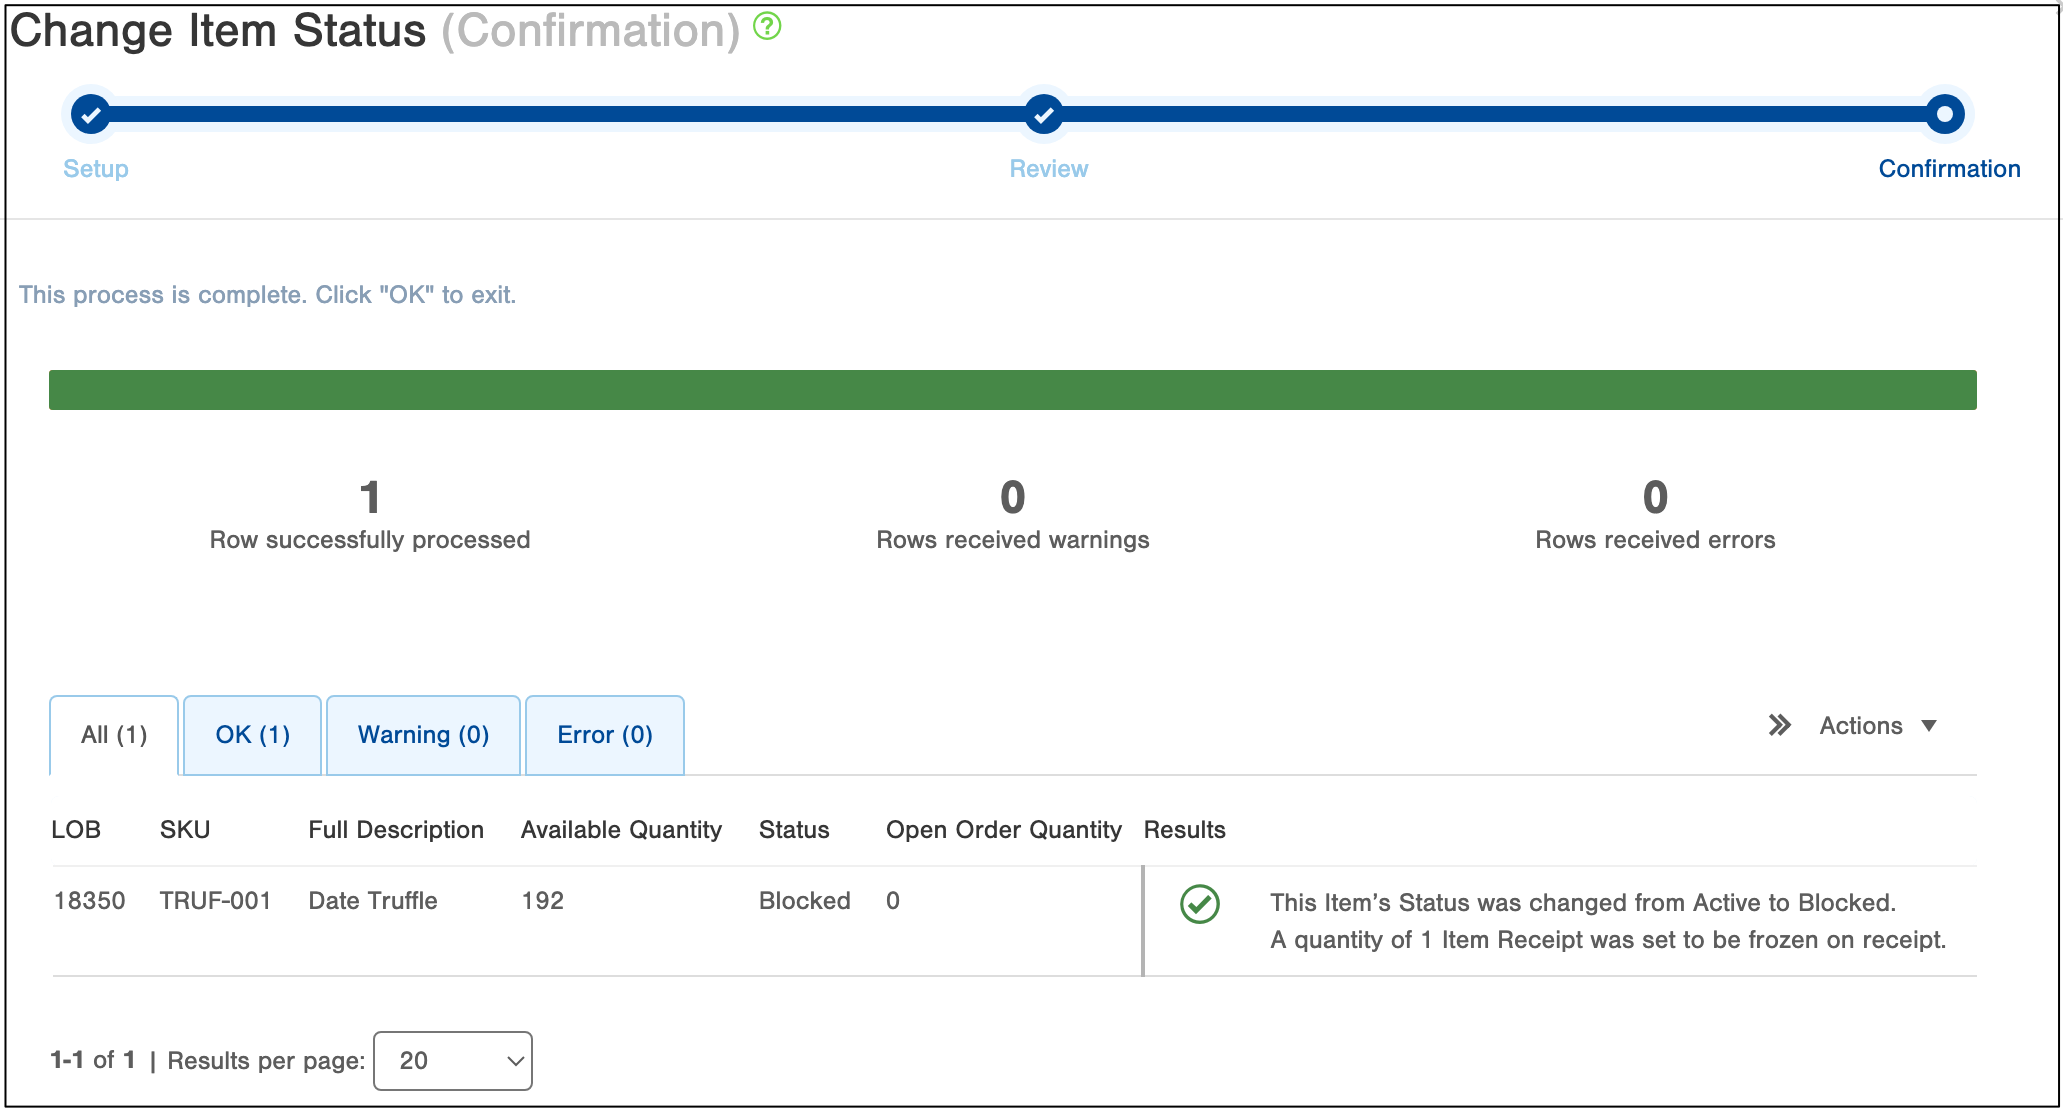
Click Submit. The Confirmation step in the process appears.
-
Click OK to return to the screen where you initiated the change.