Set up a Scheduled Plan to automate Fulfillment Plans, Replenishment Plans, and Script Plans. Here's how:
With Infoplus’s Scheduled Plans, you can automate the execution of Fulfillment Plans for Orders, Replenishment Plans for Pick Face Locations, Populate Billing Data Plans, and Script Plans for scripts. Just schedule these plans to run automatically on the days and times that you select. Infoplus provides many scheduling options to meet your business requirements and specific needs.
- Fulfillment Plans: These are predefined plans for allocating, picking, packing, and shipping a group of orders.
- Replenishment Plans: These are predefined plans for replenishing a group of Pick Face Assignments.
- Script Plans: These are predefined plans for running a script against a filtered group of records (orders, items, etc). To use the Scrip Plan option, you will need to have a Smart Filter to filter the required records and a script that does a function based on the Smart Filter.
- Populate Billing Data Plan: These are predefined plans that are used to automatically run the 'Populate Data' within the 3PL Billing module.

Create a new Script Plan to connect the Scrip and the Smart Filter together.

Use Case: To ensure rush orders placed before 2 pm are fulfilled on the current business day, create a fulfillment plan to fulfill all rush orders, then schedule that plan to automatically run at 2 pm every day. In addition, you can manage the activity on the plans with Alerts and Audits. See this article for more information on Alerts and Audits.
NOTE: When a Fulfillment Process or Replenishment Process is created by a Scheduled Plan, the System Tag of ipsys-scheduled-job will appear in the Tags section at the top of the process record. This is an informational tag that can be used to search for all processes generated by Scheduled Plans.
Caution: If you have a default warehouse set at the User Profile level, it will block all other warehouses from showing up on your scheduled plans, reports, smart filters, on your tables, etc. Selecting a default warehouse from the User Profile level will impact your view of Infoplus in all areas to only show that singular warehouse's data.
How to Schedule a Plan to Run
To begin, you will need to have already created the Fulfillment Plan, Replenishment Plan, or Script Plan that you want to run automatically. See Create a Fulfillment Plan and Create a Replenishment Plan for more information.
- Access the Manage Scheduled Plans table. Two ways:
From the Dashboard: Click the menu in the top left and select Building Blocks. Then click the Manage Scheduled Plans table.
From the Quick Actions shortcut: Press a dot (period) on your keyboard and select the Manage Scheduled Plans Table from the list of Quick Actions.
The Manage Scheduled Plans Table will open. If you have never scheduled a plan to run, the table will be blank: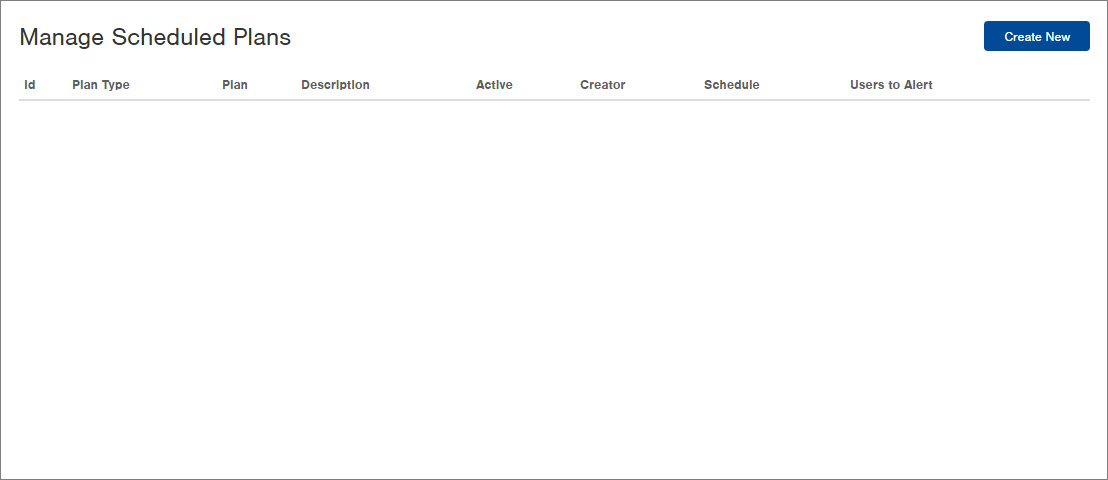
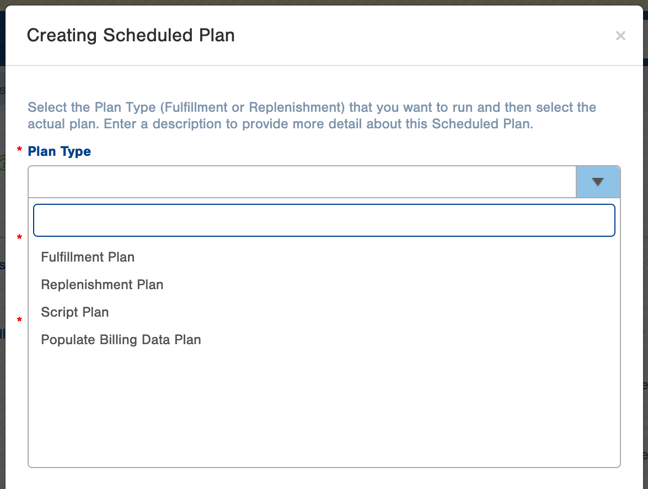
- Click the Create New button in the top right. The Creating Scheduled Plan window appears.
-
In the Plan Type field, select "Fulfillment Plan", "Replenishment Plan", "Populate Billing Data Plans", or "Script Plan".
-
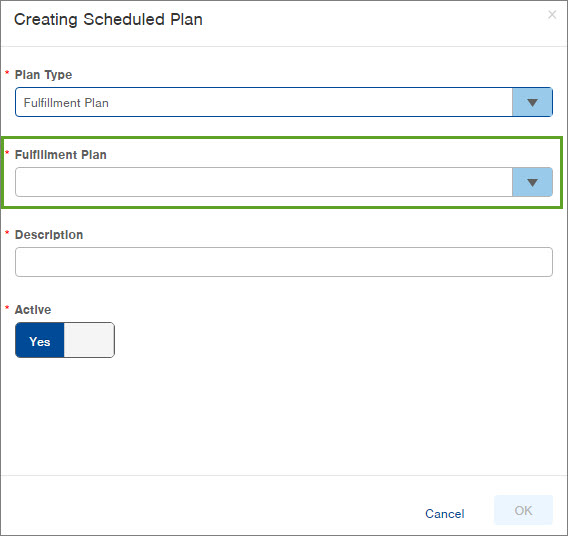
After selecting a Plan Type, the window will adjust to show a "Fulfillment Plan", "Replenishment Plan", "Populate Billing Data Plans", or "Script Plan" field. For example, here is the screen showing the additional "Fulfillment Plan" field because of the selected Plan Type:
-
-
Select the Fulfillment Plan, Replenishment Plan, Populate Billing Data Plan or Script Plan you want to schedule.
-
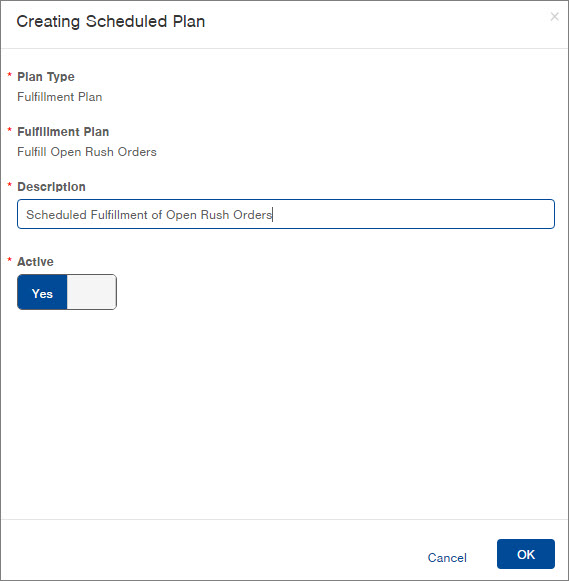
Enter a Description of this scheduled plan (e.g. Scheduled fulfillment of open rush orders).
-
By default, the Scheduled Plan will be Active. If you want to make it inactive, click on the Active field to change it to "No".
-
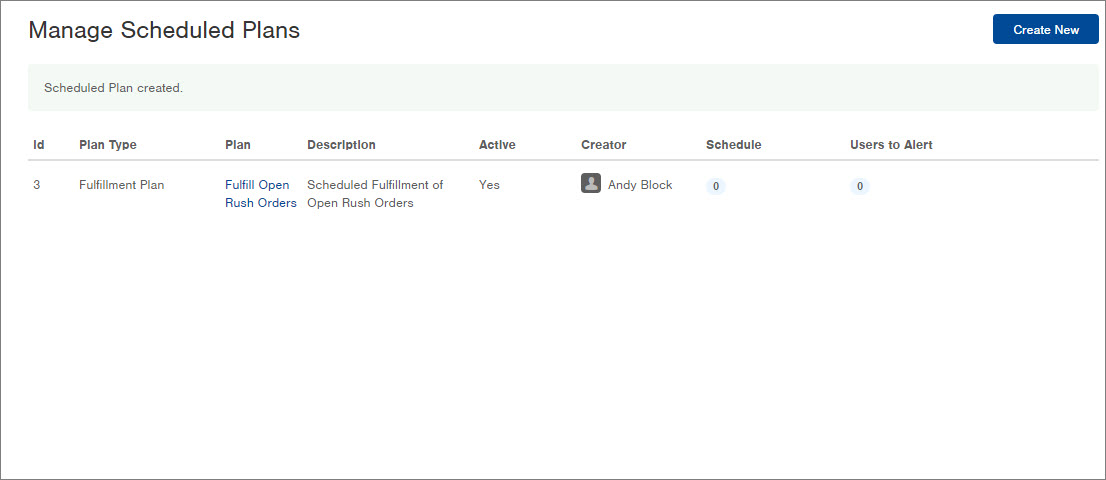
Click OK. The Scheduled Plan will appear in the Manage Scheduled Plans table. For example:
Select the Day(s) and Time(s) (The Schedule) -
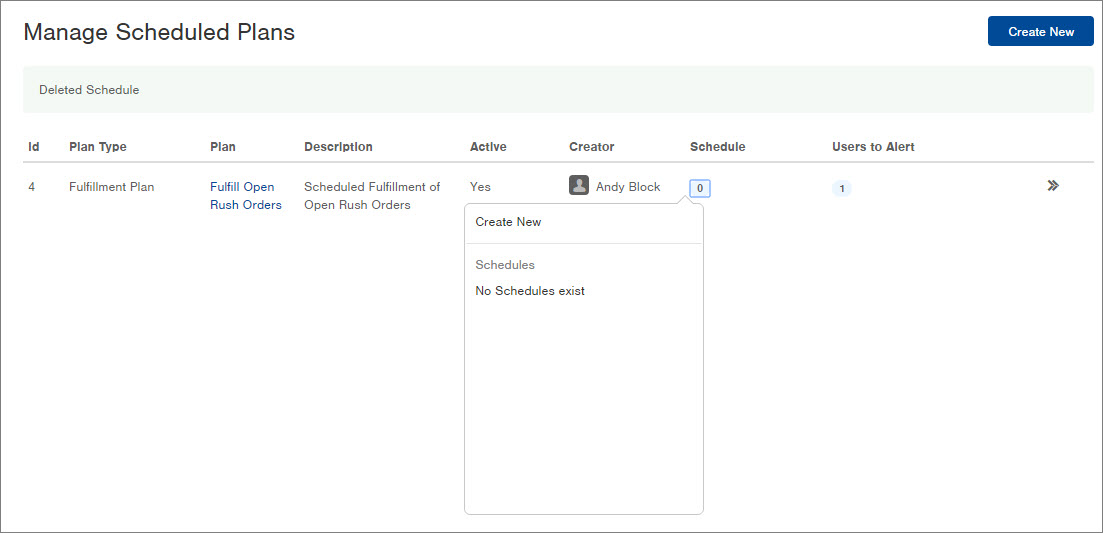
Now you need to select the day(s) and time(s) for the plan to run. Click the "0" in the Schedule column next to the appropriate plan. A drop-down menu appears.
-
From the Schedule drop-down menu, click Create New. The Create New Schedule screen appears.
-
The options in the Create New Schedule screen will differ based on Plan Type.
-
When scheduling Fulfillment Plans, Ship Date Offset and First Pick Position fields will appear. These are required fields if your Fulfillment Plan is set to pick, pack, and ship orders (as opposed to just "Allocate Only").
-
When scheduling Replenishment Plans or Script Plans, the two fields mentioned above will not appear.
This screen is an example of scheduling of a Fulfillment Plan: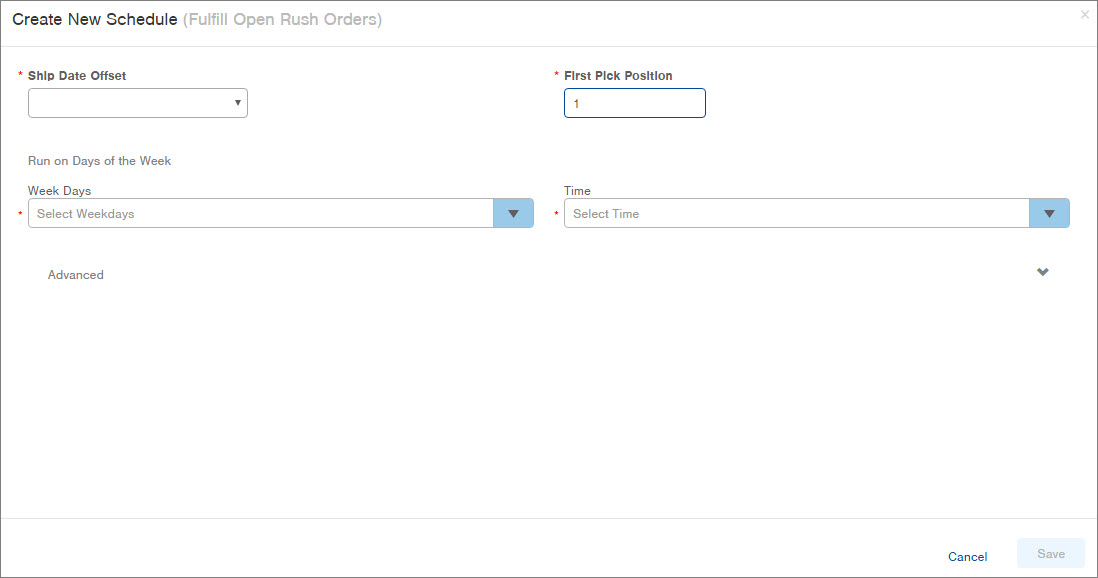
-
-
-
If you are creating a schedule for a Fulfillment Plan that is set to ship orders, select the Ship Date Offset. This sets the expected Ship Date for the orders in the Fulfillment Plan. The "Ship Date Offset" is the number of business days relative to the day the plan executes. For example, if you select a Ship Date Offset of "Current Business Day + 2", the order(s) are expected to ship two days after the plan is scheduled to run.
-
You will not see the "Ship Date Offset" field if you are creating a schedule for a Replenishment Plan.
-
-
If you are creating a schedule for a Fulfillment Plan that is set to pick inventory, verify or enter the First Pick Position This is the starting position for picking which typically begins at position 1, but can be changed as needed.
a. You will not see the "First Pick Position" field if you are creating a schedule for a Replenishment Plan. -
If creating a scheduled plan for Populat Billing Data, the screen is different from the above.

a. The 'From Date' offset tells Infoplus how many days to look into the past for activity.
b. The 'To Date' offset tells us how many days it should consider AFTER the 'From Date'.
For example: If you set up a scheduled plan to populate your billing data every week on Sunday, your 'From Days' should be set to 7 and your 'To Days' should be set to 5, this will result in all activity being captured from Monday through Friday of the previous week. For operations that run during weekends, set the 'From Date' to 7 days and the 'To Date' to 0 days.
-
If you want to schedule the plan to run on specific days of the week, click the Week Days drop-down, select the appropriate day(s), and click Done. Then click the Time drop-down and select the time.
-
All schedules created in Infoplus run on Central Standard Time. So, if you operate in a different timezone, you will need to adjust for CST.
-
If you see the error message: "error storing schedule", this means the scheduled plan ran at midnight on the dot, which is not supported. You will need to schedule the plan to run at 11:59 or 12:01 CST, but it cannot run at midnight
-
If you want more advanced scheduling options, click the Advanced link. Additional options appear.

-
To run the plan on a specific day of the month and time (e.g., the 15th of every month at 8 am), click the Run on Days of the Month option and then make your selections in that section.
-
To run the plan on certain weekdays of the month (e.g. the 1st Monday of every month at 8 am), click the Run on Certain Weekdays of the Month option and then make your selections in that section.
-
-
After making your scheduling selections, click Save. You will be taken back to the Manage Scheduled Plans table. The number in the Schedule column will update and the plan will run as scheduled.
-
You can schedule a plan to run as many times as needed. Just repeat the steps above to create another schedule.

If you need to edit or delete the days and/or times you have scheduled the plan to run, click the number in the Schedule column again. The drop-down menu appears.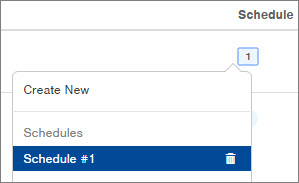
-
To edit a schedule, click on the Schedule (e.g. Schedule #1). The same Create New Schedule window will appear as before for you to make your edits.
-
To delete a schedule, click the
 icon next to the schedule.
Select Users to Alert (if desired)
-
-
If you want yourself or other Infoplus users to receive an Alert when a scheduled plan runs, click the number in the Users to Alert column next to the appropriate plan.
-
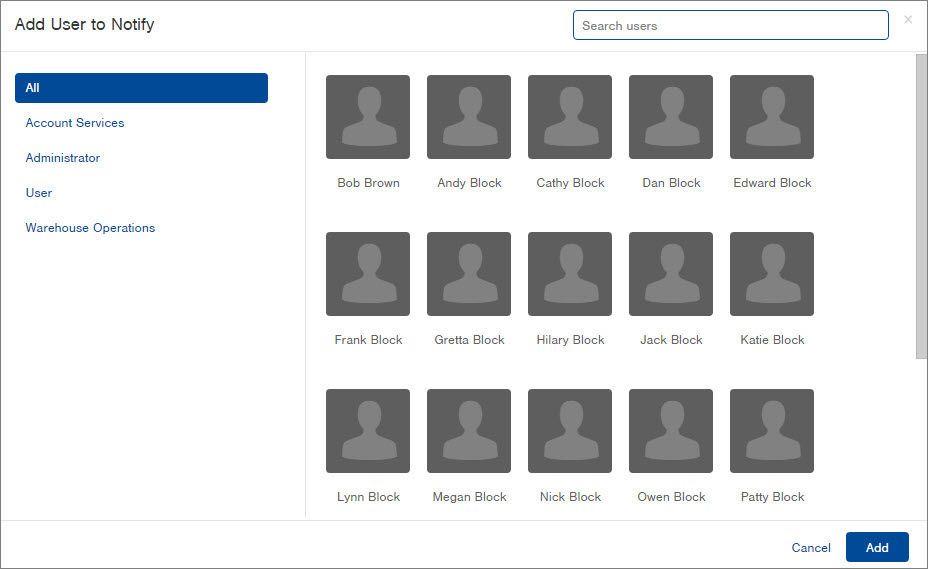
From the drop-down menu, select Create New. The Add User to Notify screen appears.
-
Click on the appropriate user and then click Add. The number in the Users to Alert column will update.
-
How the Alert is delivered to users is based on each person's personal Alert Settings, such as email or with a summary on their Dashboard.
-
-
If you want to add more users to receive alerts, perform the same steps for each user to be alerted.
-
See Manage Scheduled Plans Activity for more information on receiving Alerts about Scheduled Plans.
-
Edit a Scheduled Plan's Description and/or Active Status
- Within the Manage Scheduled Plans table, rest your mouse on the plan you want to edit. Double arrows (
 ) will appear at the end of the row.
 - Click on the
 . A drop-down menu will appear.
- Click Edit. The Creating Scheduled Plan window appears.
-
Edit the Description and/or click the Active field to change the Active status.
-
Click OK. The edits will be made and you will be taken back to the Manage Scheduled Plans table.
-
If the Scheduled Plan trigger stop working, delete then re-add the Scheduled Plan.
-
How to Delete a Scheduled Plan
- Within the Manage Scheduled Plans table, rest your mouse on the plan you want to edit. Double arrows (
 ) will appear at the end of the row.
 - Click on the
 .
. - From the drop-down menu, click Delete. A Confirmation Message will appear.
- Click OK through the Confirmation Message to delete the plan
-1.png?height=120&name=InfoPlus-Primary-Logo%20(1)-1.png)