Create Carton Types
You have to create a carton type for each unique carton you might use to ship an order if you want to use cartonization.
A Carton Type provides a name and the dimensions for a carton you plan to use for shipping. Carton Types can be used for any shipment, but they are required if you want to cartonize orders. (Cartonizing means Infoplus automatically assigns the carton type and number of cartons to be used for an Order based on items in the order.)
You can create your own Carton Types (e.g., Small Gift Box), but you can also associate Carton Types to Predefined Package Types offered by parcel carriers (e.g., USPS Flat Rate Envelope, USPS Small Flat Rate Box, FedEx One Rate, etc.). Selecting predefined package types can sometimes save you money. For example, using flat rate shipping with USPS lets you package your shipment regardless of weight.
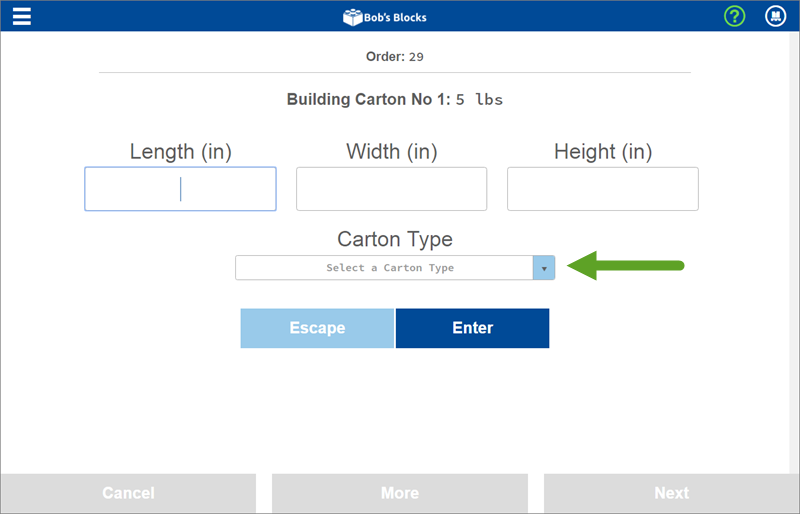
During shipping, Carton Types will automatically be selected if you are cartonizing orders, but when not cartonizing orders, you will have an opportunity to build the carton from scratch or select a carton type. Here's a sample screen when using the Shipstation Warehouse App that shows where you can select a Carton Type:

NOTE: The only Carton Types that will be available in the drop-down menu above will be:
- Carton Types that match the carrier service on the order (associating carriers to Carton Types happens through the Predefined Package Type field in the Carton Type record), and
- Carton Types that are not associated with any specific carrier.
Create Carton Types
- Access the "Carton Type" Table. Two methods:
- From the Dashboard: Click the “Warehouse Operations” tab, click the “Fulfillment" App, then click the “Carton Type” Table.
- From the Quick Actions shortcut: Press a dot (period) on your keyboard, then select “Carton Type” from the list of Quick Actions.
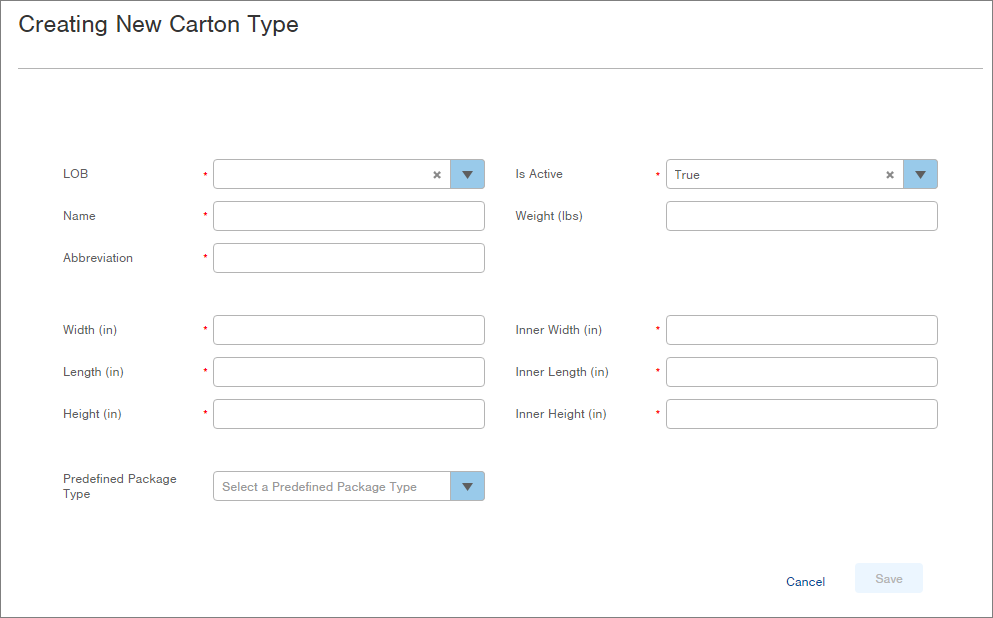
- Click the Create New button in the top right. The Creating New Carton Type window appears.

-
Select the Line of Business for the Carton Type in the LOB field.
-
Enter a Name for the Carton Type (i.e., Small Gift Box #1).
-
NOTE: If you will be associating this Carton Type to a Predefined Package Type, it is common to name the Carton Type the same as the predefined package type (e.g., USPS Flat Rate Envelope).
-
-
Enter an Abbreviation for the Carton Type (i.e., Small Box 1).
-
Enter the Width, Length and Height for the Carton Type.
-
NOTE: If you will be using a Predefined Package Type (e.g., USPS Flat Rate Envelope), enter the dimensions of that package type.
-
-
To allow the Carton Type to be used, leave the Is Active field set at True.
-
Enter the Weight of the Carton Type, if desired. This is the weight of the carton by itself with no items inside it.
-
Enter the Inner Width, Inner Length, and Inner Height for the Carton Type. For example, if you have special packaging on the inside (i.e., foam), indicate the actual inner width, length, and height in which items can be packaged.
-
If you are building Carton Types associated with specific carriers (e.g, USPS), select a Predefined Package Type (e.g., USPS Flat Rate Envelope). If you do not see the carrier option you are looking for, please contact Infoplus Support.
-
NOTE: This Carton Type will only be available for selection on orders that have a matching carrier service.
-
-
Click Save. The Carton Type will be created.