How to Create Quick Adjustments
Learn how to quickly adjust the quantity of inventory in any location in your warehouse using the Execute Quick Adjustments feature in Infoplus.
A Quick Adjustment is an adjustment to the quantity of inventory in a location. For example, if inventory has been damaged or if you incorrectly entered a quantity during receiving, you can easily adjust the inventory quantity in those locations. And if inventory is zero, you can adjust up (e.g., if you found inventory in the warehouse).
Create one adjustment at a time, or bulk load many adjustments at once from an Excel spreadsheet. See Bulk Load Adjustments for more information.
Once a quick adjustment is created, you need to Execute the Adjustment.
See this article on how to create, edit, or delete Adjustment Codes.
NOTE: You can also adjust inventory from a mobile device using the Inventory Adjustment Warehouse App .
How to Create a Quick Adjustment
- Access the Quick Adjustment table. Two ways:
> From the Dashboard: Click the “Warehouse Operations” tab, click the “Inventory Management” App, then click the “Quick Adjustment” Table.
> From the Quick Actions shortcut: Press a dot (period) on your keyboard, then select “Quick Adjustment” from the list of Quick Actions.
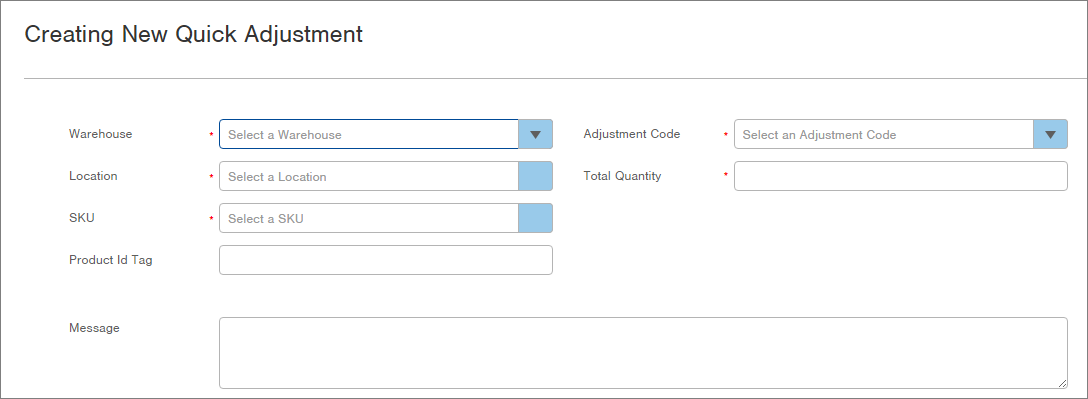
NOTE: The Inventory Adjustment table, which you will also see in the "Inventory Management" App, lists all adjustments made in Infoplus, including the Quick Adjustments. Use this table to View/Export Inventory Adjustments. - Click the Create New button in the top right. The "Creating New Quick Adjustment" screen appears.

- Select the Warehouse from where the adjustment will be made.
- Select the Location from where the adjustment will be made. If this field is disabled, it means you did not select your Warehouse in the previous step.
- If the selected Location allows Item Mixing (meaning multiple items can be stored in the Location), select the SKU that needs to be adjusted. If the Location does not allow Item Mixing (which means only one SKU is stored in that location), you do not have to select the SKU, but it is also fine to do so.
- If you are using Product ID Tags and want to adjust inventory based on this tag, enter the Product ID Tag.
- Select the reason for the adjustment in the Adjustment Code field. For example, if inventory was returned from the vendor and placed back into this location, select "Return from Vendor" as the adjustment reason. To add custom adjustment reasons to this list, please contact Infoplus Support . If more explanation regarding the adjustment is needed, use the Message field.
- In the Total Quantity field, enter the correct quantity of inventory in the location. For example, if there were 5000 items in the location and 100 were damaged, type 4900.
- In the Message field, enter more information about the Adjustment, if needed.
- Click Save. The Quick Adjustment has been created, but not yet executed, meaning the location will not yet reflect the adjusted inventory.
- To immediately execute the adjustment, click the Actions menu and select Execute Quick Adjustment.
NOTE: When a location inventory quantity is adjusted to zero, orders are unallocated. In this circumstance, the inventory allocated for these locations is returned to the original location.
How to Execute a Quick Adjustment
NOTE: You can access the Execute Quick Adjustments Process directly (Warehouse Operations > Inventory Management) or from the Quick Adjustment table. The steps below cover how to use the Quick Adjustment table.
- Access the Quick Adjustment table. Two ways:
- From the Dashboard: Click the “Warehouse Operations” tab, click the “Inventory Management” App, then click the “Quick Adjustment” Table.
- From the Quick Actions shortcut: Press a dot (period) on your keyboard, then select “Quick Adjustment” from the list of Quick Actions.
2. Click the checkbox next to each Quick Adjustment you want to execute. You can only execute Quick Adjustments with a Status of "Ready."
NOTE: To select all records that are displayed, click the checkbox in the upper left corner. Only the records on the current page will be selected, but a link at the top of the window allows you to select all records.
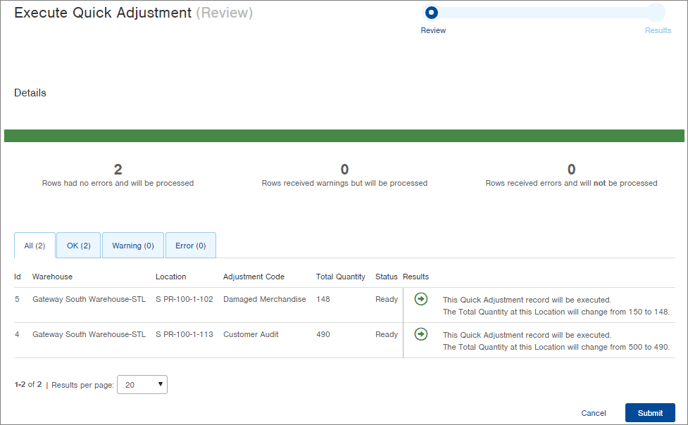
3. Click the Actions button and select Execute Quick Receipts. The Review step of the "Execute Quick Adjustment" process appears. 
The “All” tab displays the planned results of each adjustment. You can narrow your view of results by clicking on the other tabs (OK, Warning and Error).
- Review the planned Results for each adjustment in the table.
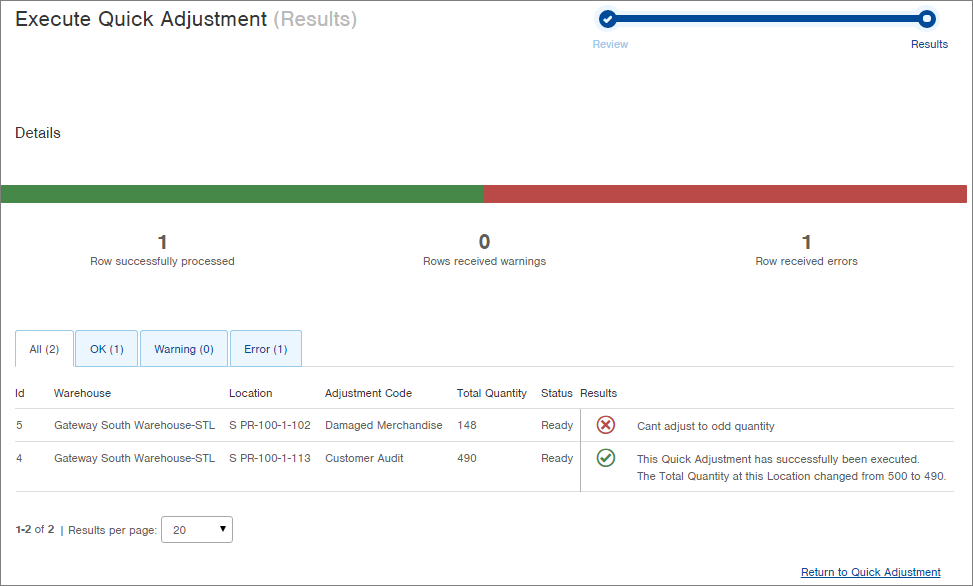
- Click Submit to execute the adjustments. The Results screen displays.

In the above example, the first adjustment could not be completed due to an odd quantity. Upon investigation, the location requires 10 units per wrap and the quantity entered (148) does not fit that wrap requirement. That adjustment will not be executed. The second adjustment was successful.
- The process is complete. You can return to the table or elsewhere in Infoplus.
NOTE: Adjustments will be reflected in the Audit activity of the related Location record and Item record. To see audit activity, open the record and select Actions > Audit. Here's an example of a location record's audit activity:

