Your Infoplus test site is loaded with data for a generic warehouse. Learn how that warehouse is set up so you can start utilizing the software to learn it.
Your Test Site contains a fully-functioning warehouse for you to learn and experiment with Infoplus. One way to learn is to understand how the warehouse in your test site was created.
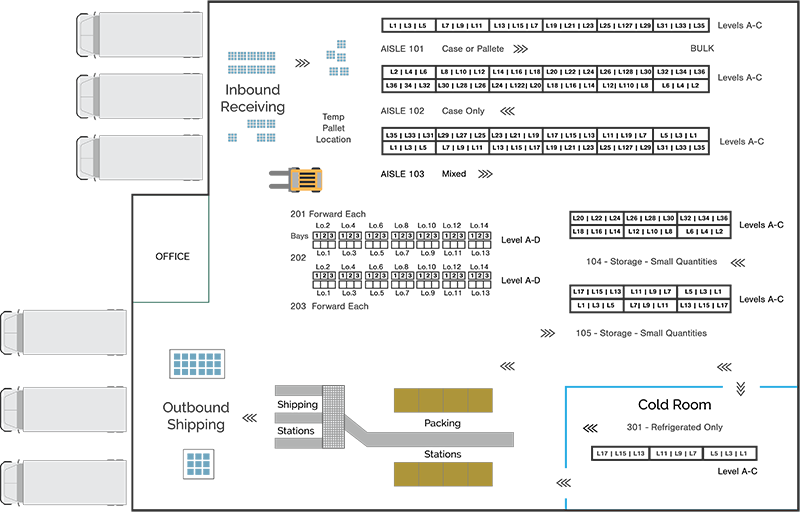
This article describes how Locations in your Test Site were created. Your Test Site was setup for this warehouse layout:

While this layout may not match the layout of your warehouse, knowing how we got from the above diagram to the information you see in your Infoplus Test Site will help you transfer that knowledge to your warehouse setup.
We suggest you open your Test Site in Infoplus and review the actual records as you read through the rest of this article.
Overview of Locations in your Test Site
Locations are the specific places you put away, pick, and replenish items that you stock. Infoplus needs a record for each location. For example, you need a storage location to represent the L17 location you see in the bottom right of the diagram (in the Cold Room). Location records are used throughout Infoplus as you perform operations (e.g., to control which items can be put into a location).
You don't have to create each individual location record in Infoplus. You can use the Location Builder to create multiple locations at once. But before you can build multiple locations, you have to:
- Create the Areas in your warehouse (e.g., buildings, zones, aisles),
- Create Attributes of your locations (e.g., footprints, billing types), and
- Create at least one Address scheme (the format to use for location labels).
Areas, Attributes, and Address Schemes In your Test Site
Here is a description of what and how records were created in your Test Site.
Areas
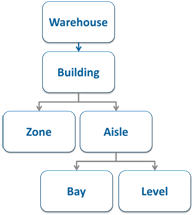
At a minimum, to do anything in Infoplus, you need a Warehouse record. Warehouse records are created for you. From there, you can get as detailed as needed to control warehouse operations. Infoplus supports these location layers:

In your test site:
- The warehouse using the above layout is called "Test Warehouse 1". (If you go to the "Warehouse" table in Infoplus, you'll see this warehouse record.)
NOTE: An additional warehouse called "Test Warehouse 2" is available that contains no locations. We suggest using Test Warehouse 2 to practice setting up locations after reviewing this article.
For "Test Warehouse 1": - There is one Building called "Test Building 1". (The Building record was created in the "Building" table in Infoplus.)
- There are 8 Zones to represent the different types of areas in your warehouse: Forward, Bulk Storage, Flow Rack, Pallet Rack, Floor, Kitting, Receiving, and Shipping. The only zones used for locations in the above layout are "Forward" and "Bulk Storage". The "Forward" zone is where replenishment occurs and the "Bulk Storage" zone is where product is stored. (Zone records were created in the "Zones" table in Infoplus.)
- There are 9 Aisles: Aisles 101-105, 201-203, and 301. (Aisle records were created in the "Aisles" table in Infoplus.)
NOTE: Levels and Bays do not need to be created as separate records. You can simply indicate the number of levels and bays (if needed) when building locations.
Attributes
Attributes provide location dimensions (the "Footprint") and billing information (the "Billing Type") for locations.
- There is one Footprint in your Test Site called "Pallet." (The Footprint record was created in the "Location Footprint" table in Infoplus.) A footprint represents the physical dimensions of the location. In your Test Site, all locations have the same "Pallet" footprint which is 50" x 60" x 50".
- There is one Billing Type in your Test Site: "No Charge." (The Billing Type record was created in the "Location Billing Type" table in Infoplus). A billing type can be used to assign a cost to storage of an item (e.g. to bill by square foot). In your Test Site, we are not assigning costs to storage of items. A billing type record is required to create locations, so we have created a "No Charge" billing type.
NOTE: You do not need to create separate attributes for each warehouse (e.g., You can also use the "Pallet" footprint when creating locations in "Test Warehouse 2" if needed).
Address Schemes
An Address Scheme tells Infoplus how to label your warehouse locations. An Address Scheme is required when building multiple locations at once.
- In your Test Site, two address schemes have been created:
- "Default": This address scheme looks like this: [aisle]-[locationNumber][level]. This scheme tells Infoplus to put the Aisle number first, then a dash, then the Location Number and finally the level. So, if looking at the bottom right of the diagram above, you would see a location label like this: 301-017A. The location is in Aisle 301, Location Number 17, Level A. NOTE: The address scheme also indicates how many digits to use for each number (e.g., the "Default" address scheme indicates to use 3 digits for the location number, so a zero was added in front of "17").
- "Default plus Bay": This address scheme will add the "bay" as part of the address like this: [aisle]-[bay]-[LocationNumber][Level]. This scheme would only be used when building locations where bays are used (e.g., the Forward Each locations in the diagram above).
NOTE: You do not need to create separate address schemes for each warehouse (e.g., You can also use the "Default" address scheme when creating locations in "Test Warehouse 2" if needed).
How Locations Were Built in Test Warehouse 1
We used the Location Builder to create multiple locations at once in Infoplus. You can only create multiple locations that are in the same area and contain the same attributes. For example, we created all locations in Aisle 101, then we created locations in Aisle 102, and so on.
Here is Aisle 101 from the diagram:

You can see that there are 3 levels (A-C), and 36 actual locations.
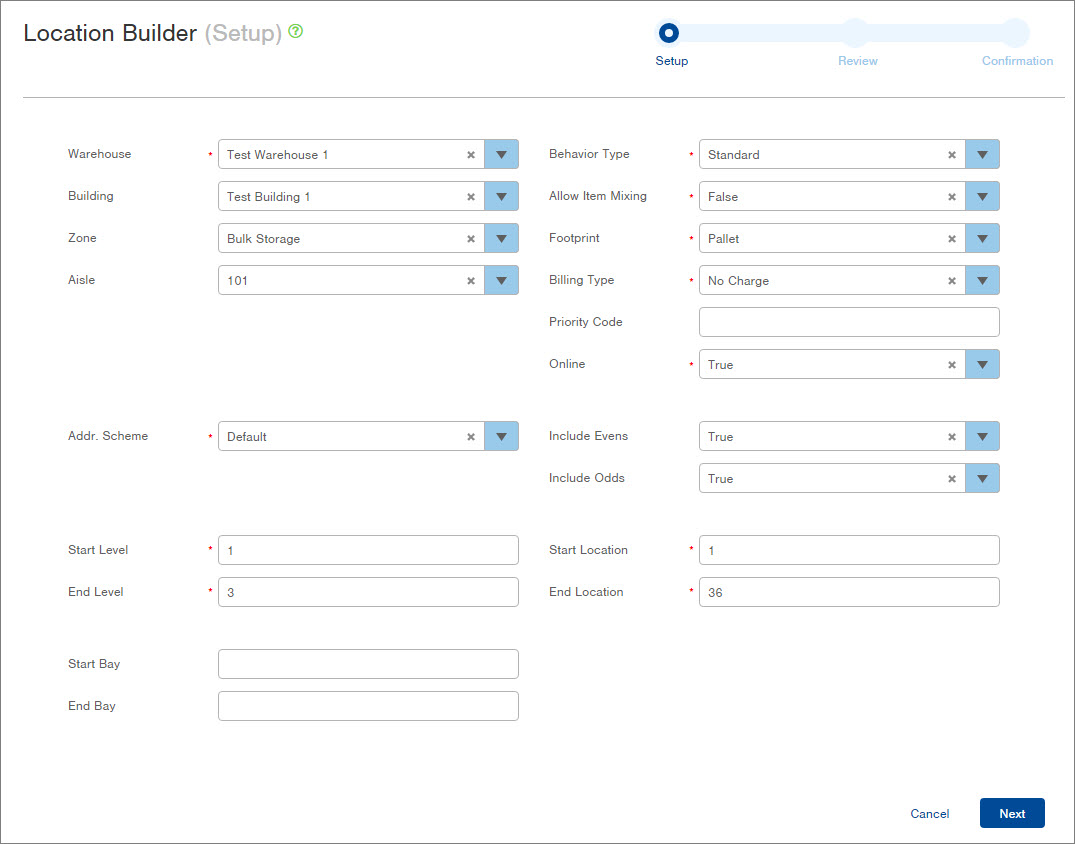
To create all of these locations in Infoplus, we entered the following information into the Location Builder:

NOTE: "Behavior Types" are created by the system ("Standard" is a generic behavior type). "Allow Item Mixing" indicates if multiple SKUs can be stored in the location."Priority Code" (an optional field) allows you to make this location take priority over other locations during operations (the higher the number, the higher the priority).
The Location Builder selections above tell Infoplus to create locations:
- In the "Bulk Storage" zone
- Using the "Default" Address Scheme ([aisle]-[locationNumber][level])
- For Odd and Even locations (both sides of the aisle)
- For three levels (1-3 will be translated to A-C)
- For locations 1 through 36.
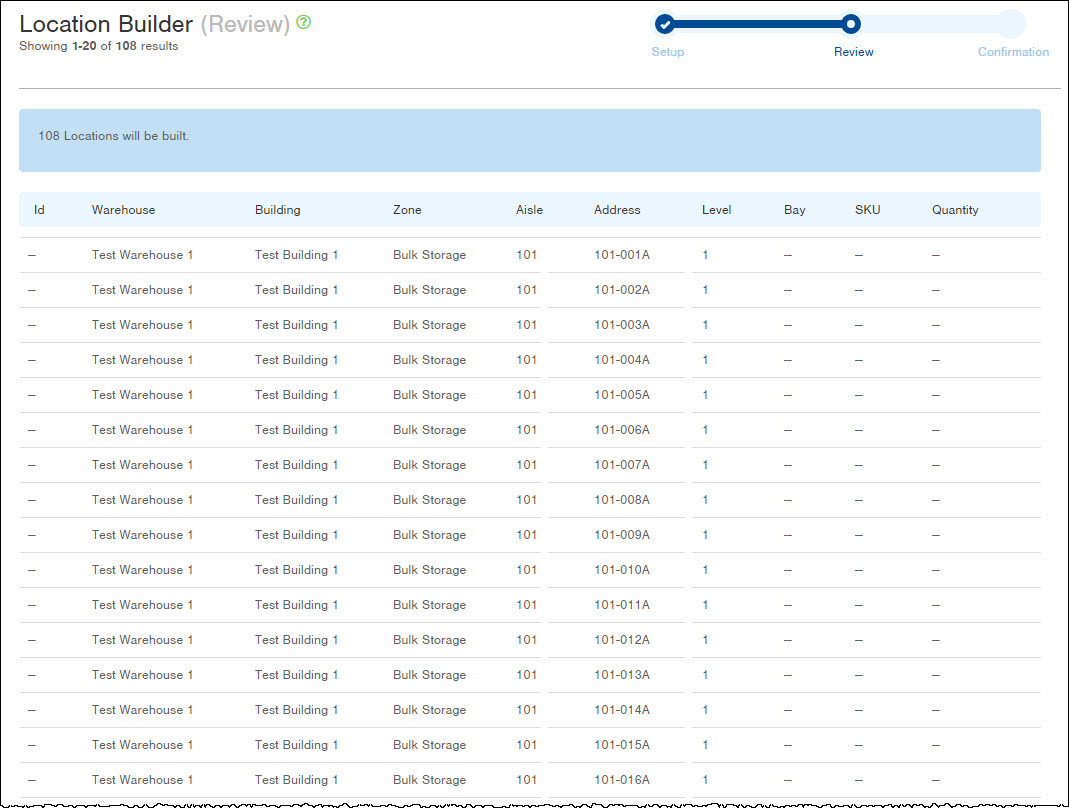
The result was the creation of 108 locations (36 locations in three levels). Sixteen of the locations are shown in the screenshot below:
We then did this for each of the other Aisles in the warehouse layout diagram to create all of our locations.
That completed the process of creating locations in Test Warehouse 1.
Suggested Next Steps
Setup your actual warehouse in your Infoplus test site using "Test Warehouse 2". Even though you can't "move" your test warehouse to your live site, once you have your test warehouse setup properly, it will be easy to view the test site records for recreation in your live site.
If you haven't already, you might want to draw your warehouse layout on a sheet of paper to determine what areas you need to create. Then consider what the attributes should be and what format you want for your location addresses. Create all the necessary records in Infoplus in "Test Warehouse 2".
The article above did not provide step-by-step instructions on how to create each type of record, but here is a summary of the steps taken with links to the step-by-step instructions:
-1.png?height=120&name=InfoPlus-Primary-Logo%20(1)-1.png)