How to Create / Manage Triggers
Save time and streamline your processes with Triggers. A Trigger is an automated action taken by the system on a saved smart filter.
Automating Your Workflow with Triggers
Triggers allow automated actions to be taken by Infoplus based on your Smart Filters. For example, you could automatically add a retail catalog to every order placed via your retail website.
How Triggers Work:
- Create a Smart Filter: Smart Filters can help define the criteria for your desired action.
- (e.g., you could create a smart filter called "Website Orders" that only displays order with the order source "Website Orders").
- Set Up a Trigger: Attach an action to the smart filter
- (e.g., you could add an Action to "Add Line Item" to these orders and add a "RETAIL-CATALOG" SKU).
Available Trigger Actions:
- Add Line Item
- Send Email
- Tag Record
- Untag Record
- Change Carrier
- Change Warehouse
- Run Script
Multiple Actions: One trigger can perform multiple actions, like adding a line item and sending an email.
Limitations:
- If you use a trigger to automatically run fulfillment and your trigger includes the "Add Line Item" trigger action, avoid using the "Fulfillability" field (on the order table) in your smart filter setup. This combination can cause errors.
- Triggers don't work with system-generated tables like Inventory Snapshot or Order Activity.
Triggers will NOT work on the following System-Generated tables:
| Alert | Low Stock |
| API Log | Order Activity |
| Billing Code Activity | Order Line |
| Cart Location | Order Line Activity |
| Carton Activity | Packing Detail |
| Inventory Detail | Perpetual Inventory Log |
| Inventory Snapshot | Script Log |
| Item Activity | Shopping Cart Connection Log |
| Item Receipt Activity | Storage Activity |
| Item Usage | Warehouse Inventory |
| Job Time Activity | Work Activity |
Create a Trigger
NOTE: The smart filter you want to act upon must be created before you can create the trigger. See for information.
- Access the Manage Triggers window by pressing the dot (.) on your keyboard and selecting Manage Triggers from the drop-down menu.
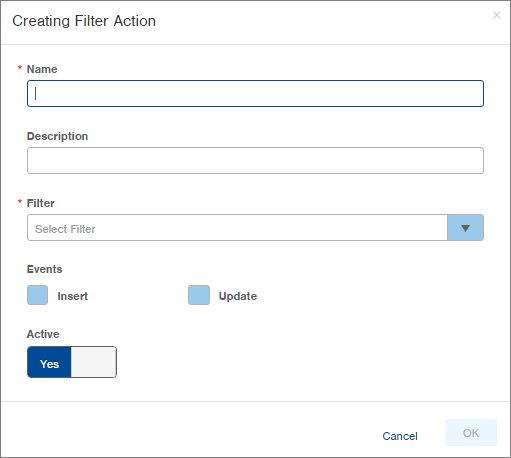
- Click the Create New button in the top right. The Creating Trigger window appears:

- Type a Name for the trigger (i.e., "Include Retail Catalog").
- (Optional) Enter a Description for the Trigger.
- Select the Filter to be used in this trigger (i.e., “Website Orders”).
- NOTE: If using an order filter for a trigger that will make changes to the orders as they're inserted, be sure to include the "Pending" status in the order smart filter. This is necessary when using a trigger that will change orders as they're inserted.
- Select on which Event(s) the action should occur.
- "Insert" means the action will take place when a new record is created/inserted that meets the smart filter criteria.
- "Update" means the action will take place when an existing record is updated which makes it then meet the smart filter criteria.
- NOTE: When updating data within a Custom Field on a record, the data update will NOT activate the "Update" function of the trigger to fire.
- If you want this trigger to be Active immediately, leave the Active slider set to Yes. If you do not want the trigger to be active, click the Active slider to change it to No.
- Click OK. The trigger will display in the list. Here is a sample.

NOTE: To run the smart filter used in a Trigger, click the that appears at the end of the row when you rest your mouse on the row, and select Run Smart Filter.
 - Now you need to create the action to be taken on the smart filter: Click the “0” that appears in the Actions column for the trigger. A drop-down menu will appear:
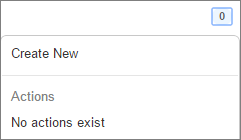
- Click Create New. The Create Actions window appears.

- Select the Action Type (i.e., to include a retail catalog with an order, select the “Add Line Item” action type). NOTE: Only action types available for the table used in the smart filter will display.
- Based on the action type selected, additional fields will appear. Enter or select the required information. (i.e., If you select the “Add Line Item” action type, you will need to enter the SKU and Quantity of the item to be added. If you select the “Run Script” action type, you will need to select an existing Script.)
- Click Save.
- A “ 1 ” will now appear in the Actions column in the Manage Triggers window. Continue to add actions as needed (i.e., If you want an email to be sent to an individual when a record matches the selected smart filter, you could add the “Send Email” action to this same smart filter by clicking the number in the Actions column).
Reorder Triggers
Triggers will run in the order in which they display in the Manage Triggers window. You can modify this order to ensure some actions occur before others.
- Access the Manage Triggers window by pressing the dot (.) on your keyboard and selecting Manage Triggers from the drop-down menu.
- Click and drag the 8-dots icon (
 ) that appears to the left of the Trigger to be moved.
 - Release your mouse when you have placed the Trigger into the desired location.
Edit a Trigger
These instructions refer to editing or deleting the Trigger entirely, not editing or deleting the action used within the Trigger. (NOTE: You cannot edit an action used in a trigger action. For example, you cannot edit the "Add Line Item" action you assigned to a trigger. You would need to delete the action and create a new one.)
- Access the Manage Triggers window by pressing the dot (.) on your keyboard and selecting Manage Triggers from the drop-down menu.
-
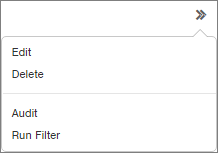
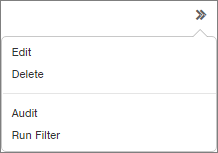
Rest your mouse on the trigger and click the double arrows icon (
 ) that displays at the end of the record.
-
To Edit the Trigger, click Edit. Make the necessary edits and click Save.
-
To Delete the Trigger, click Delete. Click OK through the confirmation.
From this drop-down, you can also see the Audit log for the Trigger and Run the Smart Filter associated with the Trigger.
Edit / Delete a Trigger Action
NOTE: You cannot edit an action used in a trigger. For example, you cannot edit the "Add Line Item" action you assigned to a trigger. You would need to delete the action and create a new one.
- Access the Manage Triggers window by pressing the dot (.) on your keyboard and selecting Manage Triggers from the drop-down menu.
- To Edit a Trigger Action, click the number that appears in the Actions column next to the Trigger that you want to edit. A drop-down will appear:
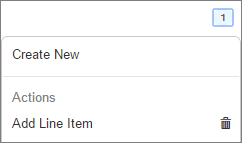
3. To Delete a Trigger Action, click the trash can icon (![]() ) next to the action to be deleted. Click OK through the confirmation.
) next to the action to be deleted. Click OK through the confirmation.
Audit a Trigger
View an audit log of activity taken on a trigger.
- Access the Manage Triggers window by pressing the dot (.) on your keyboard and selecting Manage Triggers from the drop-down menu.
-
Rest your mouse on the trigger and click the double arrows icon (
 ) that displays at the end of the record.
-
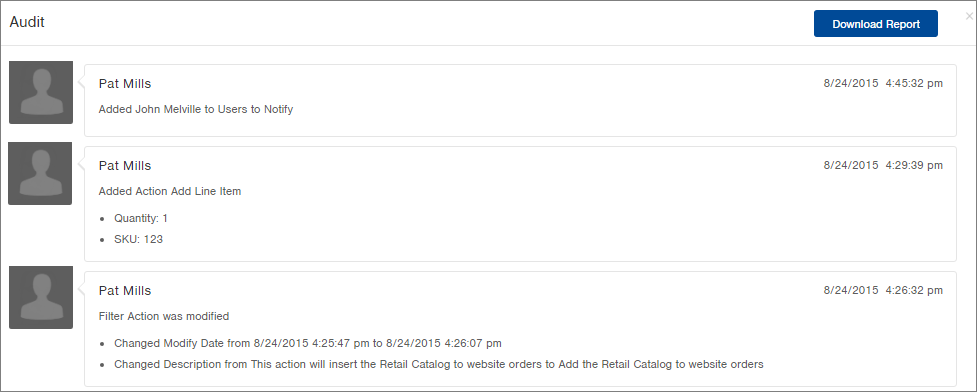
Select Audit. The Audit Log appears. Here is an example:

-
To download an Excel file of audit data, click the Download Report button. See Audit a Record for more information on downloading audit data.
-
Click the Close link to close the window.
Manually Run the Smart Filter Associated with a Trigger
- Access the Manage Triggers window by pressing the dot (.) on your keyboard and selecting Manage Triggers from the drop-down menu.
-
Rest your mouse on the trigger and click the double arrows icon (
 ) that displays at the end of the record.
 -
Click Run Smart Filter. The table associated with the smart filter will open with the smart filter applied.
Safeguard against “update” triggers running more than once
To guard against update triggers running twice, many clients will set up smart filters and tags to denote an order that has already had a certain script run against it. To do so you can follow the steps below:
- Modify your script so that a tag is added when the script is run, such as ‘scriptID-script-tag’
- You can additionally modify your script to include a check for your newly created tag. This check should get the current tags on the order and then see if any equal your new tag
- For example:
/* ------------------------------------------------------------------------------------------------------------*/

/* Script to check if an order already has a specific tag associated with it in Infoplus */

/* ------------------------------------------------------------------------------------------------------------*/

// Check if the order has a specific tag

function orderHasTag(tag) {

   var hasTag = false;

   var orderTags = infoplusApi.getTags("order", order.orderNo); // Get all tags on order

   for (var i = 0; i < orderTags.size(); i++) {

      if (tag == orderTags.get(i)) {

         hasTag = true;

         break;

      }

   }

   return hasTag; // Return whether the order has the tag

}

/* ----------------------------------------------------------------------------------------------------------- */

// Check if the order has the tag when the script runs

const previouslyRanTag = "scriptID-script-tag";

if (!orderHasTag(previouslyRanTag)) {

     //run script logic

     utils.log("Adding tag '" + previouslyRanTag + "'");

     infoplusApi.addTag("order", record.orderNo, previouslyRanTag);

}

else {

    utils.log("Found the tag '" + previouslyRanTag + "', indicating test script has already run on order. Exiting script without making any order modifications.")

    return;

} - Create a smart filter that includes a check for your new tag. You can do so by navigating to the order table adding a “tag” filter and selecting your tag name for the filter value.
- For example: