How to login into Infoplus with Single Sign-On using Ping Identity.
Setup Single Sign on into Infoplus with a Ping Identity Account
Infoplus supports single sign on (SSO) through Ping Identity. An account will need to be established with Ping Identity that supports the "SAML" single sign on protocol. Once this account is established, you should have access to the information required by Infoplus to complete the single sign on setup.
This information should be entered into the "Authentication Provider" table. The information required to be input into Infoplus includes:
| Field | Description |
| Name | Enter a unique name to allow you to identify this Authentication Provider (e.g., "Ping Identity") |
| Provider | At this time, the only provider supported by Infoplus is "Ping Identity", so select that option. |
| Protocol | At this time, the only protocol supported by Infoplus is "SAML", so select that option. |
| Entity Id | Identity for your account with the Authentication Provider. This value should be provided to you by Ping Identity. |
| SSO Redirect URL | Single Sign On URL. This value should be provided to you by Ping Identity. |
| SLO Redirect URL | Single Logout URL. This value should be provided to you by Ping Identity. |
| Certificate | Authentication provider's X509 signing certificate encoded in base64 format. This value should be provided to you by Ping Identity. |
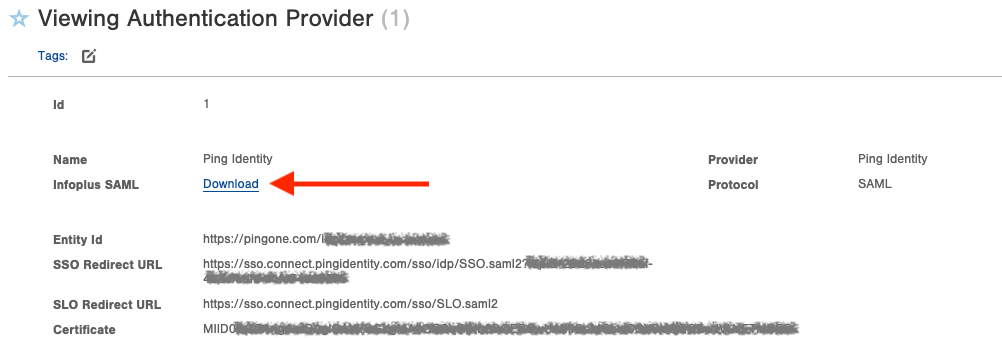
After you have saved your Authentication Provider record, you can download a SMAL metadata file from Infoplus by clicking the Download link next to the Infoplus SAML field on the Viewing Authentication Provider screen. You may need to upload this file to your authentication provider to complete the setup on their side.

After your setup (on both sides) is complete, you can log in to Infoplus using Ping Identity, by clicking the PingIdentity logo on the Infoplus login screen. You will be redirected through their login process, and then sent back into Infoplus.


-1.png?height=120&name=InfoPlus-Primary-Logo%20(1)-1.png)